1. Quick Start Lixor transcribes lecture audio in real time and translates it into multiple languages simultaneously for your participants. This chapter takes a first-time instructor through opening their first session.
중요
From 2.5.16, you cannot create a session without microphone access. Connect a microphone and grant browser permission before you start. See 10. Troubleshooting for details.
1.1 Launching and Signing In#
Launch the Lixor Host app. The server starts automatically and your browser opens.
Launch the Lixor Host app. The server starts automatically and your browser opens.
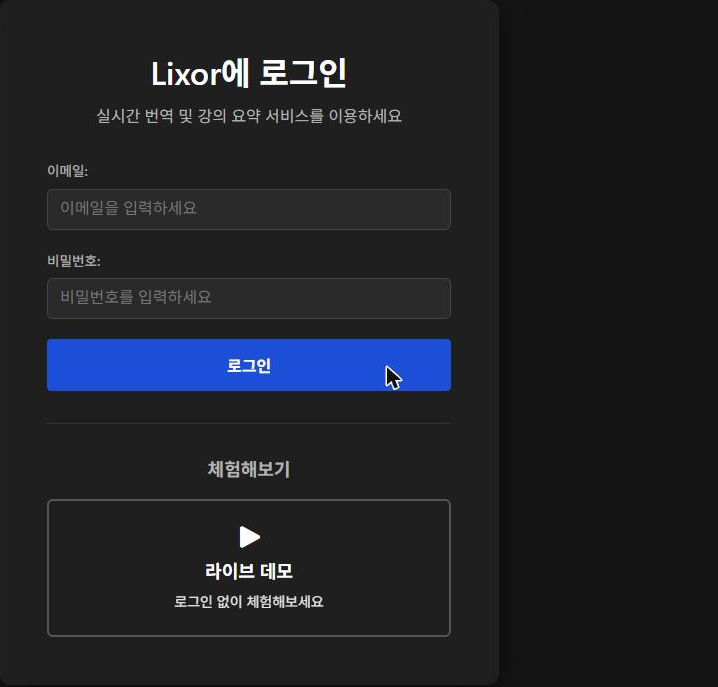
When the browser opens, the login screen appears. Enter your email and password, then sign in.
Lixor login screen 1.2 Choosing a Profile#
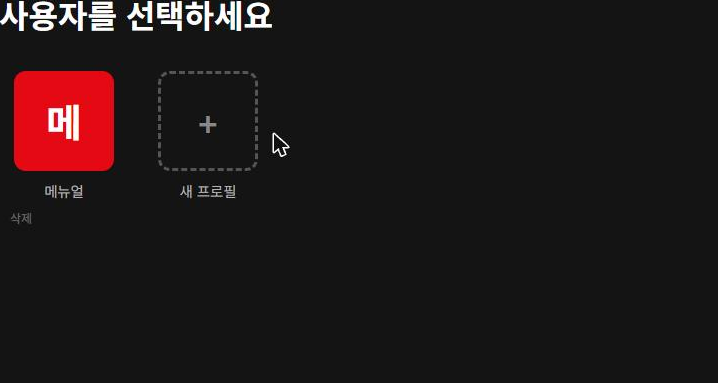
After signing in, a profile selection screen appears. Click the profile you want to use.
Profile selection screen If you have no profile yet, create one. See 3. Profile Management .
1.3 Starting Your First Session#
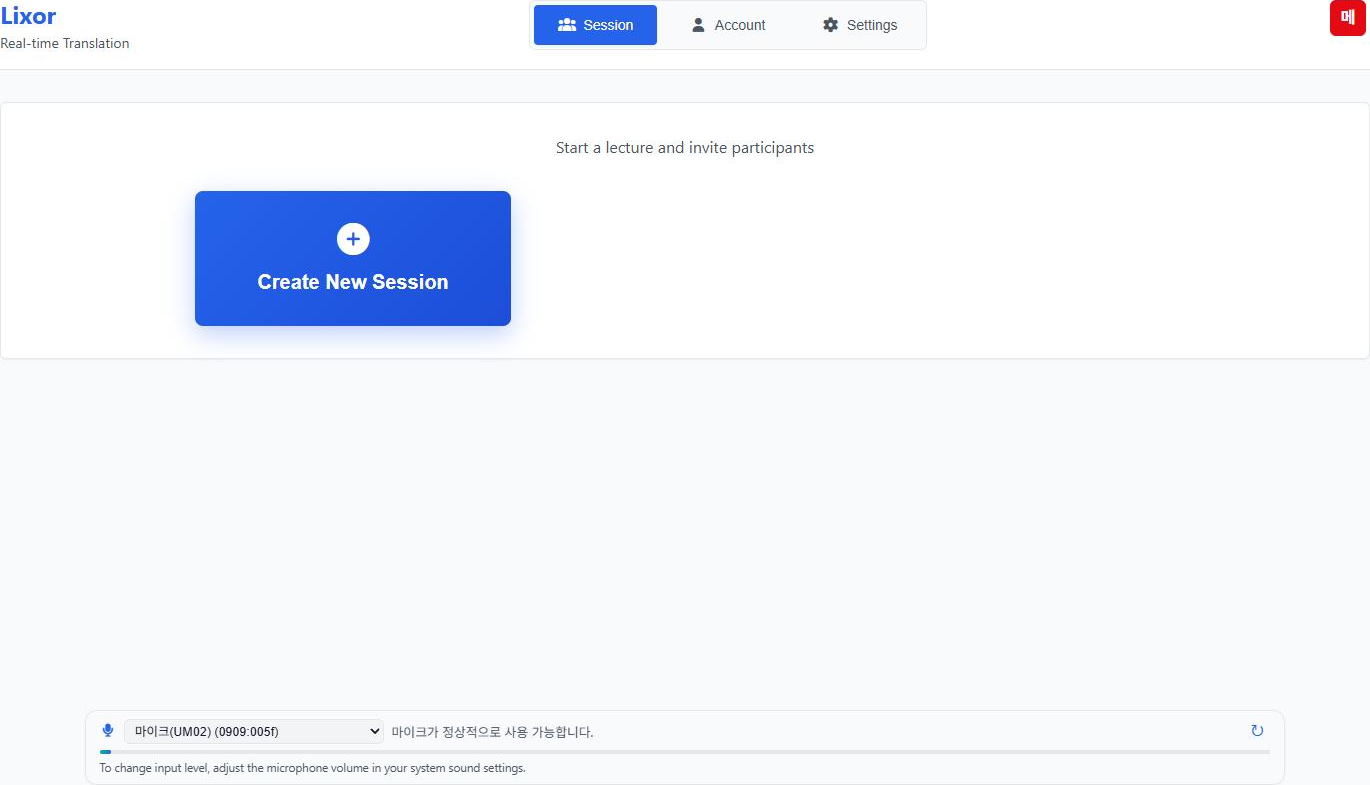
Choosing a profile opens the Session tab. A microphone status bar is always shown at the bottom.
Session tab
Click Create New Session .
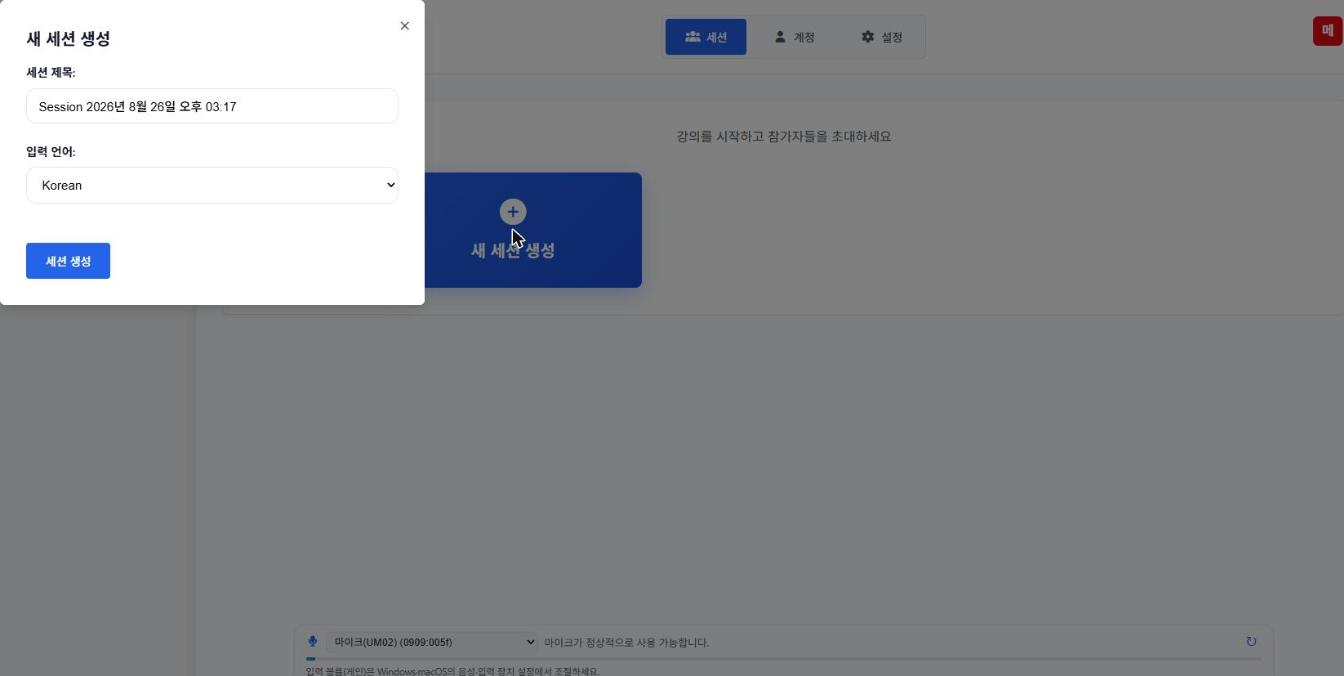
Enter a session title and select the input language (the language you will speak).
Confirm to create the session.
Create session dialog 참고
Recording starts automatically once the session is created. Unlike earlier versions, you no longer press a microphone button first.
1.4 Inviting Participants#
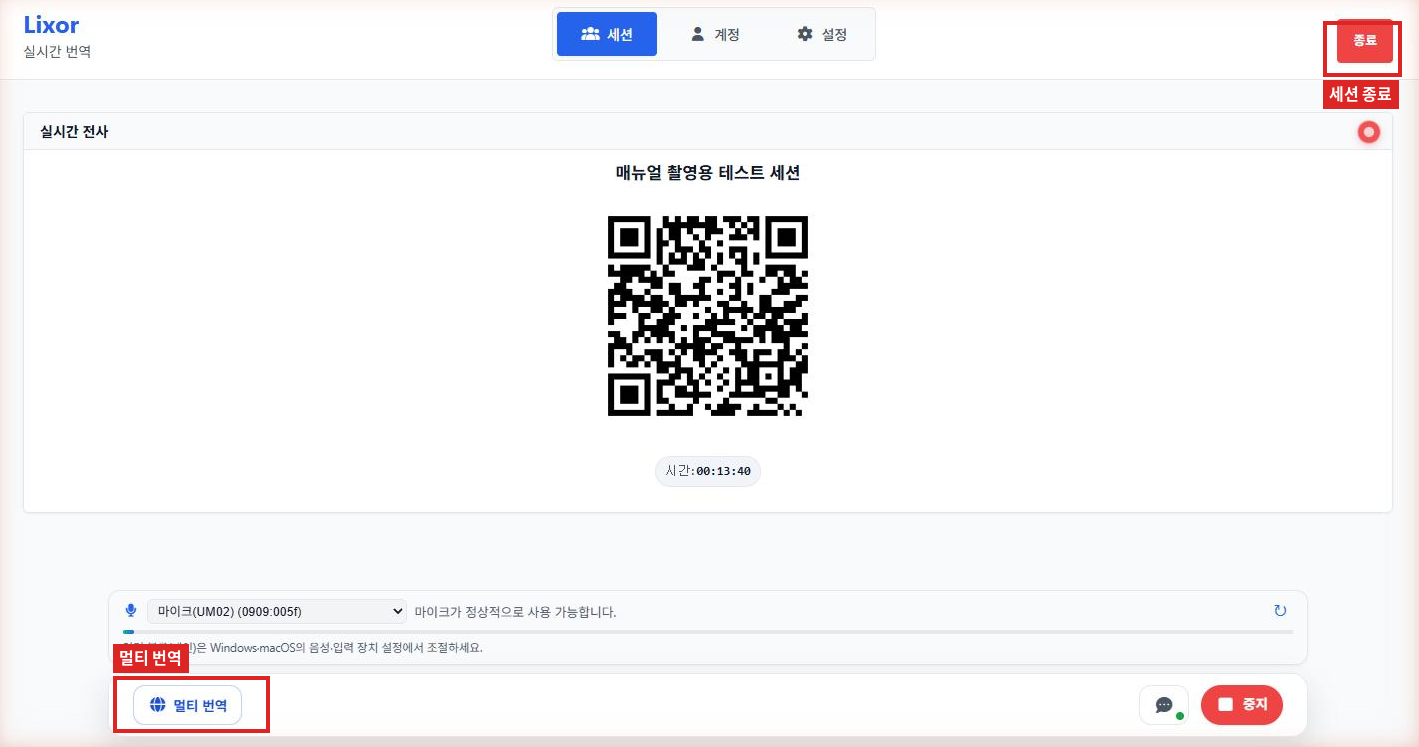
When the session starts, a large join QR code is displayed in the centre of the screen.
Live session screen Show this QR code to your students. They scan it with their phone camera and join immediately — no app installation required.
주의
From 2.5.16 the 6-digit session code is no longer displayed. Reading the code aloud is no longer possible; you must invite participants with the QR code. Codes for past sessions appear in the recent sessions list — see 9. Usage and Session History .
1.5 Ending a Session#
When the lecture is over, click the red End button at the top right, then confirm. The transcript is saved and you return to the Session tab.
2. Signing In and Demo 2.1 Login Screen#
Lixor login screen Element Description Email Your registered email address Password Your password Sign In Signs you in Live Demo Try Lixor without signing in
참고
Only the login screen uses a dark background. Every screen after sign-in is light.
2.2 Live Demo#
Click Live Demo to open the multilingual simultaneous translation view without signing in. It is convenient for introductions and demonstrations.
Allow microphone access and start speaking to see live translation.
2.3 Signing Out#
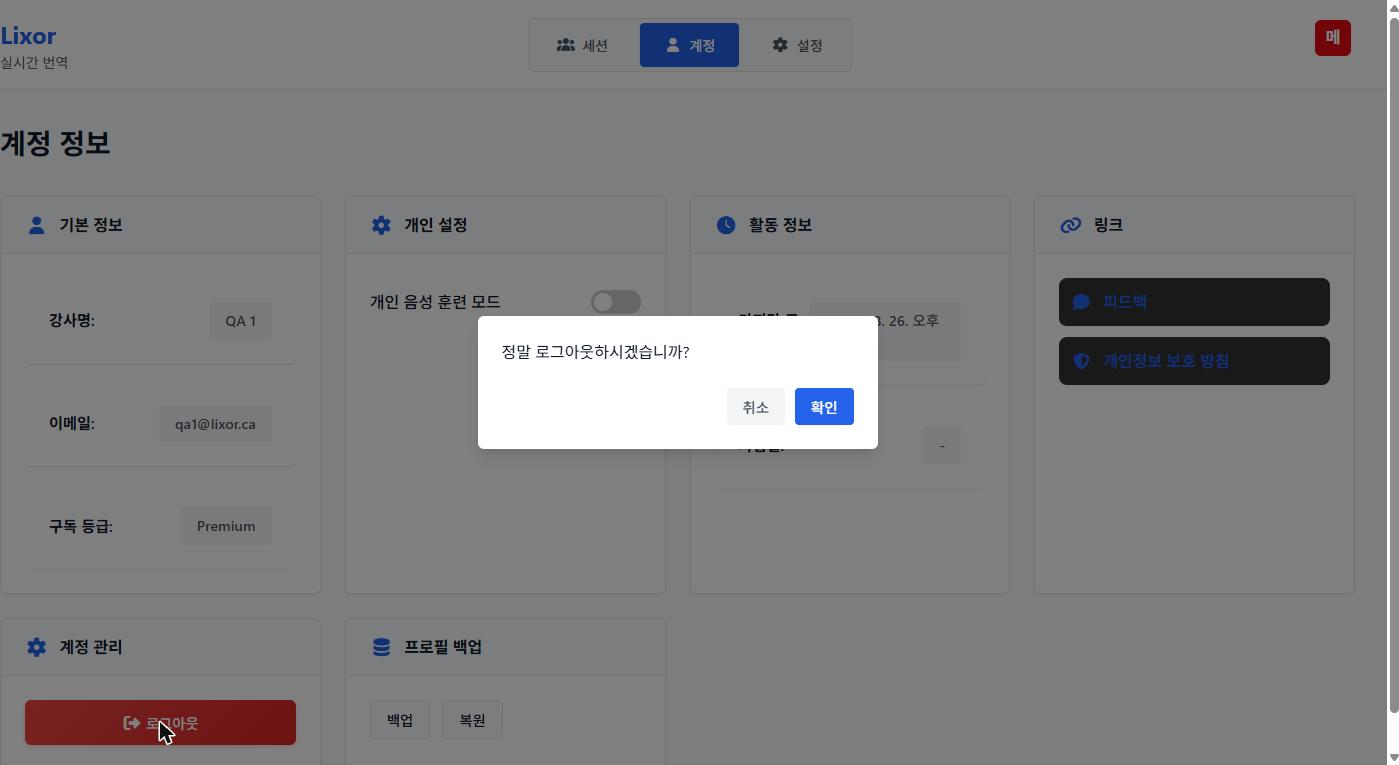
Go to the Account tab → Account Management card → Logout , then confirm.
Logout confirmation 3. Profile Management New in 2.5.16. Profiles let you keep separate settings for different courses or subjects within a single account.
3.1 Selecting a Profile#
A profile selection screen appears right after signing in. Clicking a profile starts your session with that profile's language, font and session settings applied.
Profile selection screen 3.2 Creating a Profile#
Click the New profile (+) tile.
Enter a profile name .
Enter the major / subject (for example, Computer Science).
Click Create .
3.3 Deleting a Profile#
Click Delete below the profile tile.
주의
Settings from a deleted profile cannot be recovered. Back them up first.
3.4 Switching Profiles#
To change profile mid-lecture, click the profile badge at the top right of the screen.
3.5 Backup and Restore#
Managed from the Profile backup card on the Account tab.
Button Description Backup Downloads the current profile settings as a file Restore Applies settings from a backup file
Profile backup card on the Account tab 팁
Back up before changing computers or reinstalling — your language settings and glossary carry over intact.
4. Running a Session This is the default screen after signing in. Most of a lecture happens here.
4.1 Session Tab#
Session tab Element Description Create New Session Starts a new lecture session Microphone selector Chooses which microphone device to use Microphone status Shows whether a microphone is detected Refresh (↻) Scans for microphones again
The microphone bar at the bottom is always visible, and the input level meter moves as you speak.
참고
Input level (gain) cannot be adjusted in the app. Change it in your Windows or macOS sound input settings.
4.2 Creating a Session#
Click Create New Session to open the dialog.
Create session dialog Field Description Session title Lecture title. Left blank, the date and time are filled in automatically Input language The language the instructor speaks
Confirming creates the session and starts recording automatically.
4.3 Live Session Screen#
Live session screen Top
Element Description Live transcript Switches between the transcript view and the QR view Recording indicator Turns red while recording End (top right) Ends the session
Centre
Session title
Join QR code
Elapsed session time (HH:MM:SS)
Bottom
Element Description Multi translation Opens the multilingual translation panel (5. Multi Translation ) Question icon Locks or unlocks participant questions Stop Stops recording
4.4 Locking Questions#
The speech-bubble icon at the bottom locks questions. Hovering over it shows the current state.
State Meaning Questions open Participants may ask questions Questions locked Participant questions are blocked
4.5 Ending a Session#
Click End at the top right and confirm. This does the following:
Stops any recording in progress
Saves the transcript
Invalidates the session code
Returns you to the Session tab
주의
Ending a session immediately invalidates the QR code and session code, so participants cannot rejoin. Do not end the session during a break.
Transcripts of ended sessions are available in 9. Usage and Session History .
5. Multi Translation Displays translations in several languages on one screen at the same time. This replaces the "Triple Simultaneous Translation" and "Translation Window" features of earlier versions.
참고
In 2.5.16 the Triple Simultaneous Translation item was removed from the Settings menu. Enter this view from the Multi translation button at the bottom of the live session screen.
5.1 Entering and Leaving#
During a session, click Multi translation at the bottom to open a full-screen panel. Click the collapse icon at the bottom left to return to the Session tab.
Multi translation panel 5.2 Panel Layout#
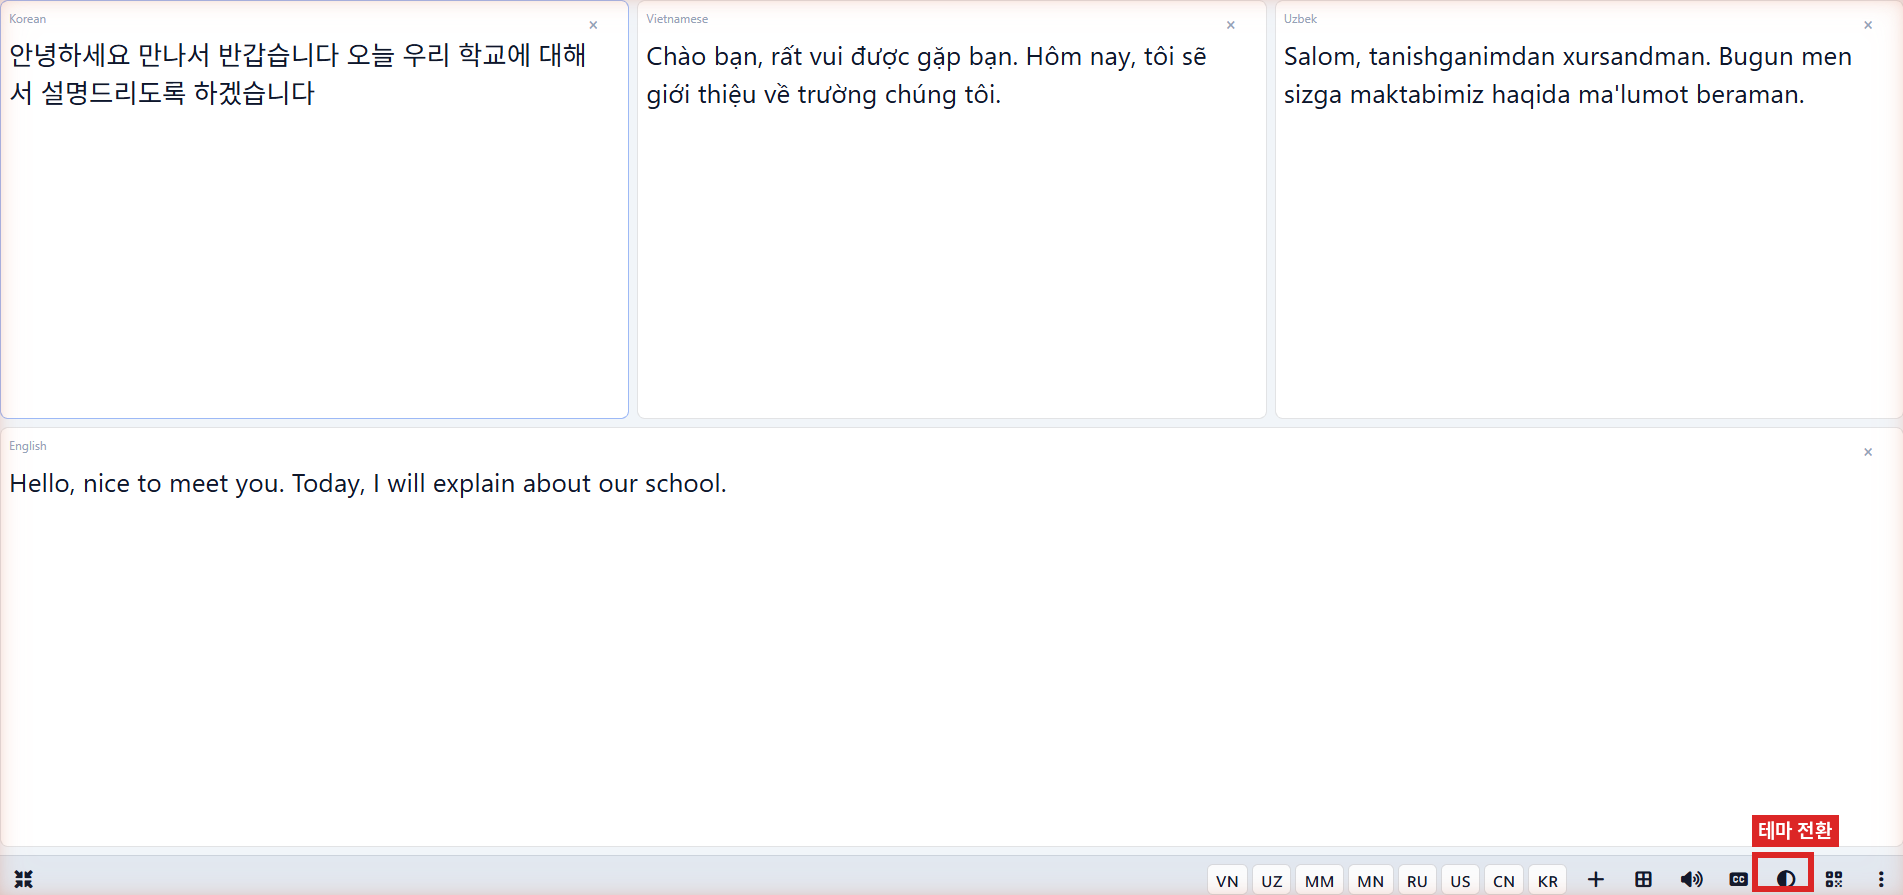
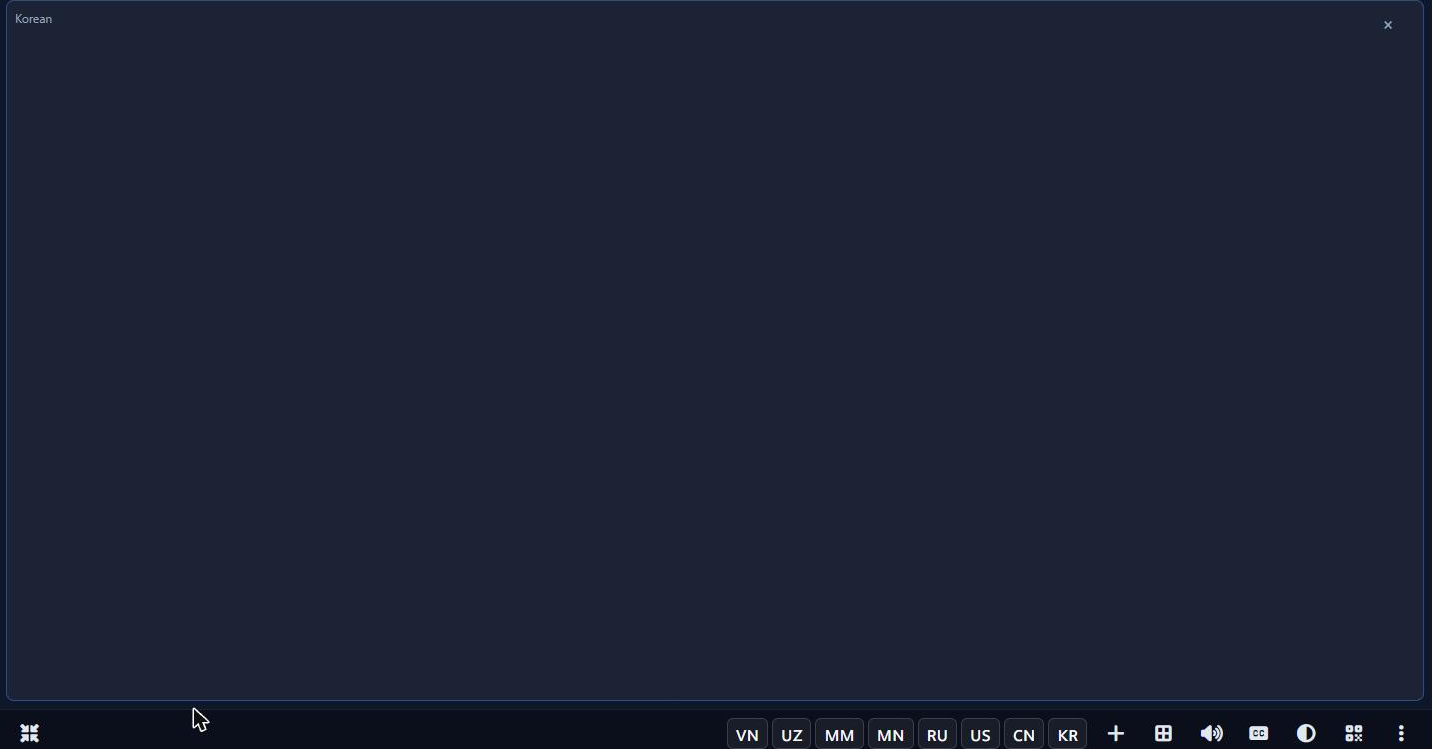
Each language gets its own panel, labelled at the top left (Korean, Vietnamese, and so on).
The panel for the instructor's spoken language shows the source text ; the others show that language's translation .
Click the × at the top right of a panel to close that language.
The arrangement adjusts automatically to the number of panels.
Button Description 🇻🇳 🇺🇿 🇲🇲 🇲🇳 🇷🇺 🇺🇸 🇨🇳 🇰🇷 Vietnamese · Uzbek · Myanmar · Mongolian · Russian · English · Chinese · Korean + Add a language ⊞ Change layout 🔊 Listen (TTS) CC Show captions ◐ Switch light / dark theme QR Show the join QR code ⋮ More options
Clicking a flag adds or removes that language's panel.
5.4 Theme#
The multi translation panel supports light and dark themes. Switch with the ◐ button; your choice is remembered for next time.
Multi translation panel in dark theme 팁
Dark suits a dimly lit lecture hall; light reads better on a projector.
5.5 If Picking Languages Each Time Is Tedious#
Save a frequently used language set and you can start from a single button on the Session tab. See 6. Quick Start Modes for setup.
6. Quick Start Modes Start a session with a single button instead of picking languages every time. Save a frequently used language set and a dedicated button appears on the Session tab.
Session tab with Quick Start buttons 중요
Neither button appears until you have saved its settings. If the Session tab shows only Create New Session , nothing has been saved yet.
6.1 Setting Up Quick Start (Multi)#
Saves the language set for showing several translation panels at once.
Go to Settings → Translation Settings .
Check the active languages list further down the page.
Add languages under Add language :
click a country button (VN · UZ · MN · NP · MM · US · CN · KR), or
pick one from the Other languages dropdown and click +.
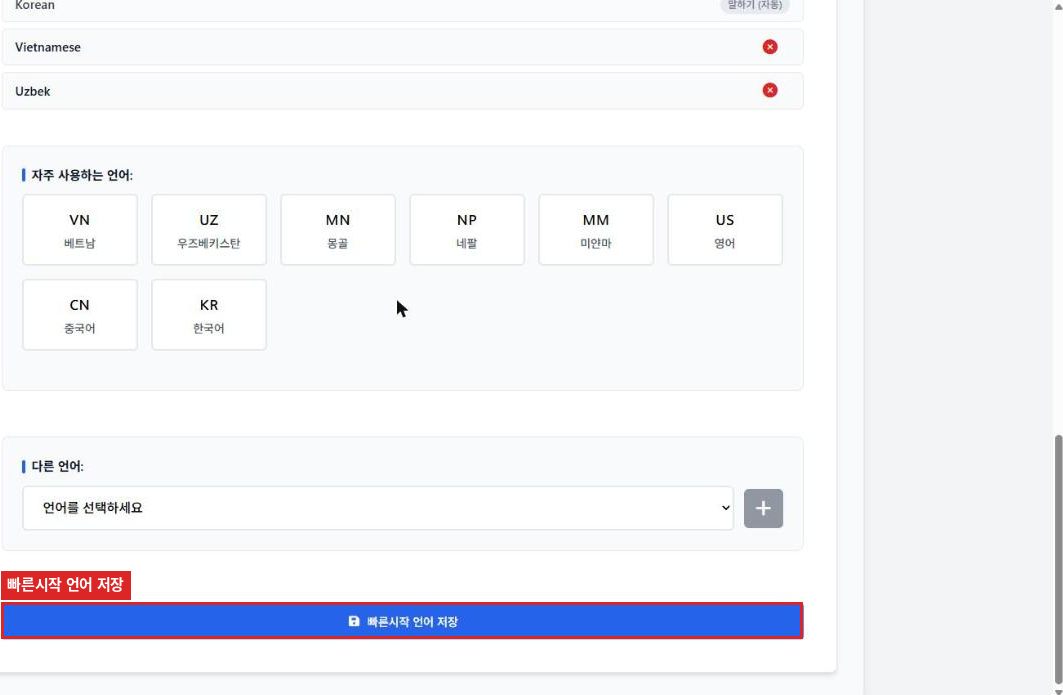
Click Save quick start languages .
Save quick start languages at the bottom of Translation Settings Once saved, the Quick Start (Multi) button appears on the Session tab. Clicking it starts a session with that language set and opens the multi translation panel.
팁
Click the red ✕ beside a language in the active list to remove it. After changing languages you must save again for the change to take effect.
6.2 Setting Up Quick Start (Caption)#
Saves the language set for overlaying captions on your lecture screen.
Go to Settings → Overlay .
Turn Overlay on .
Choose the caption languages under active languages and Add language .
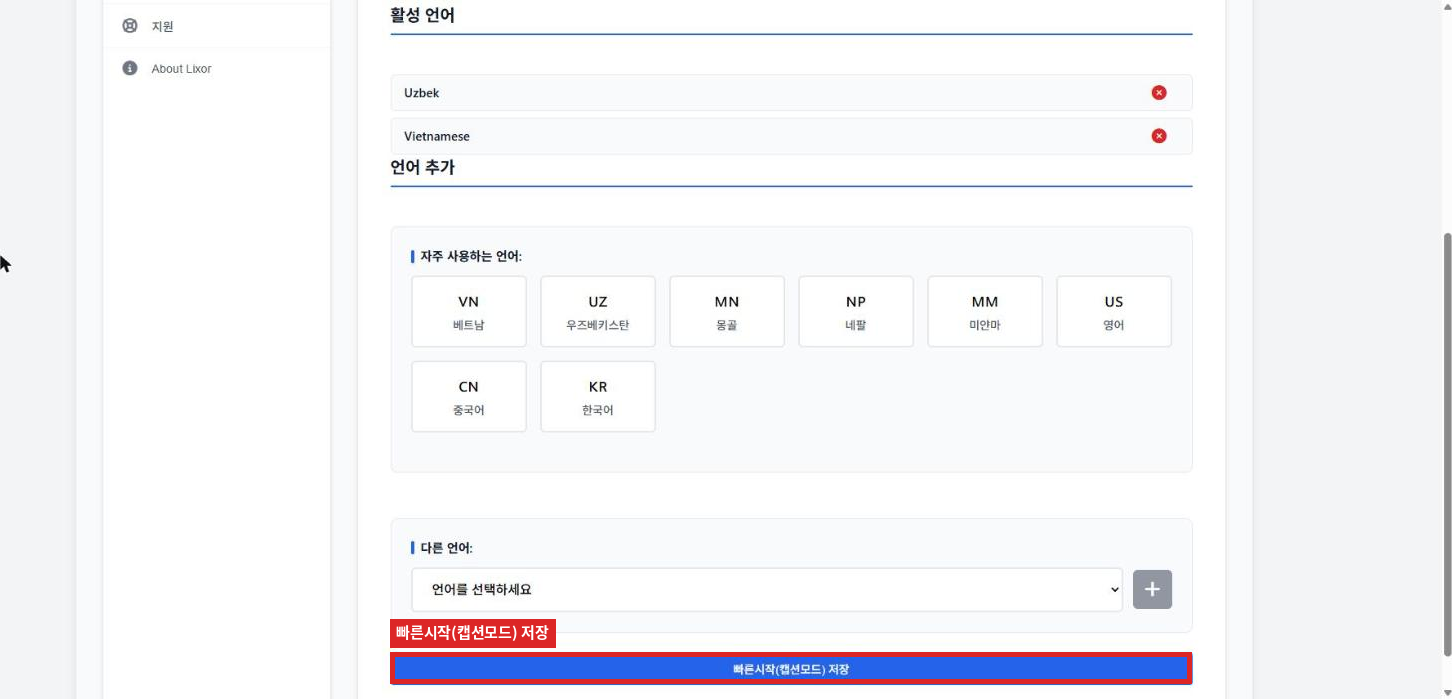
Click Save Quick Start (Caption) .
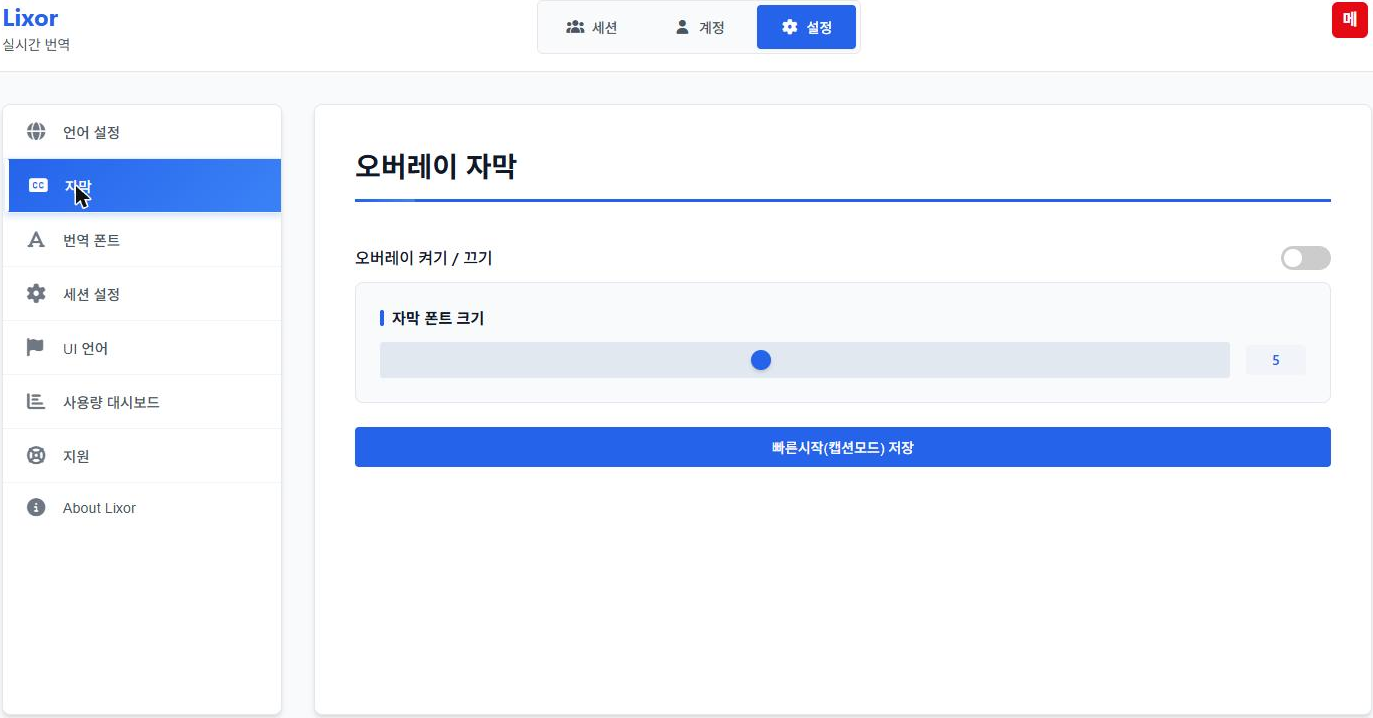
Save Quick Start (Caption) at the bottom of Overlay settings Once saved, the Quick Start (Caption) button appears on the Session tab.
참고
The active languages and Add language sections appear only after the overlay is turned on. With the overlay off, you see just the save button.
Button What it does Quick Start (Multi) Starts a session with the saved languages and opens the multi translation panel Quick Start (Caption) Starts a session with the saved languages and shows overlay captions Create New Session Starts a session with a title and input language you enter yourself
7. Settings Tab Click the Settings tab at the top. The left menu has eight items.
7.1 Translation Settings#
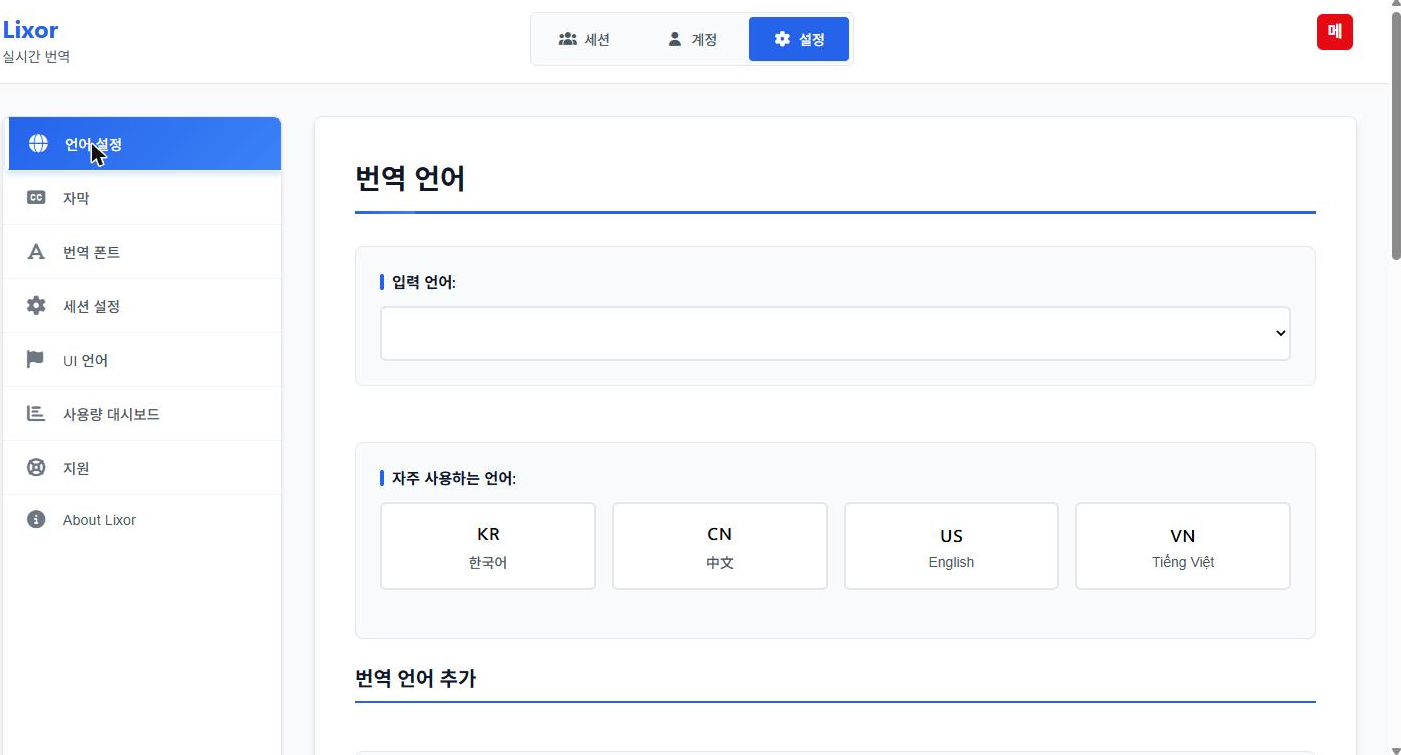
Translation settings Translation languages
Item Description Input language The language the instructor speaks. 108 languages supported Frequently used languages Quick buttons: 한국어 · 中文 · English · Tiếng Việt
Adding translation languages
Element Description Frequently used languages Vietnamese · Uzbek · Mongolian · Nepali · Myanmar · English · Chinese Other languages Select additional languages from the dropdown
Multi-translation quick start languages
Choose the language set for the Quick Start (Multi) button on the Session tab, then save it.
7.2 Overlay#
Displays captions on top of your lecture screen.
Overlay caption settings Item Description Overlay on / off Whether overlay captions are used Caption font size Slider Save Quick Start (Caption) Saves the current setup to the Quick Start (Caption) button
참고
The active languages and add language sections appear only after the overlay is turned on.
7.3 Translation Font#
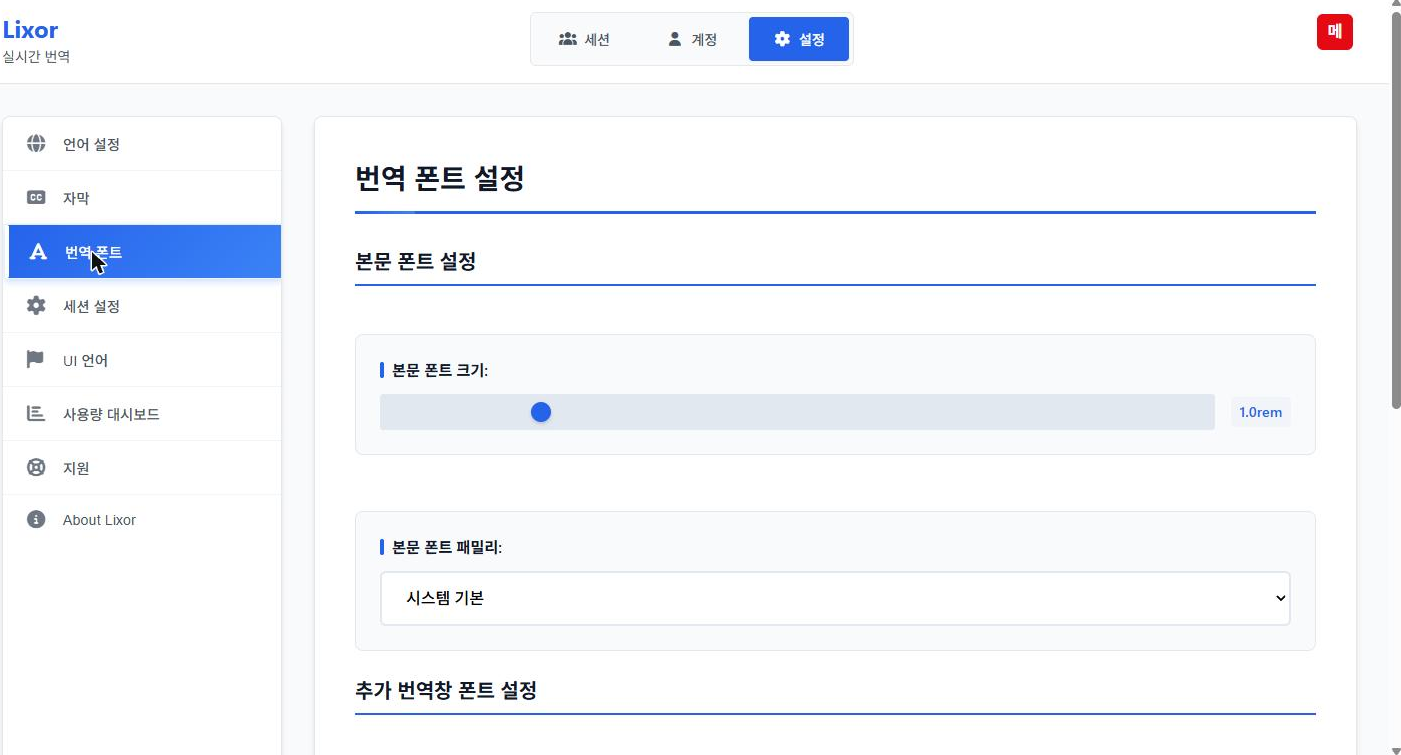
Translation font settings Body font
Item Description Body font size Slider (default 1.0rem) Body font family System default, Noto Sans, Malgun Gothic, Nanum Gothic, Arial, Helvetica
Translation window font
Item Description Translation window font size Slider (default 1.2rem) Translation window font family Font selection Restore defaults Resets all font settings
7.4 Session Settings#
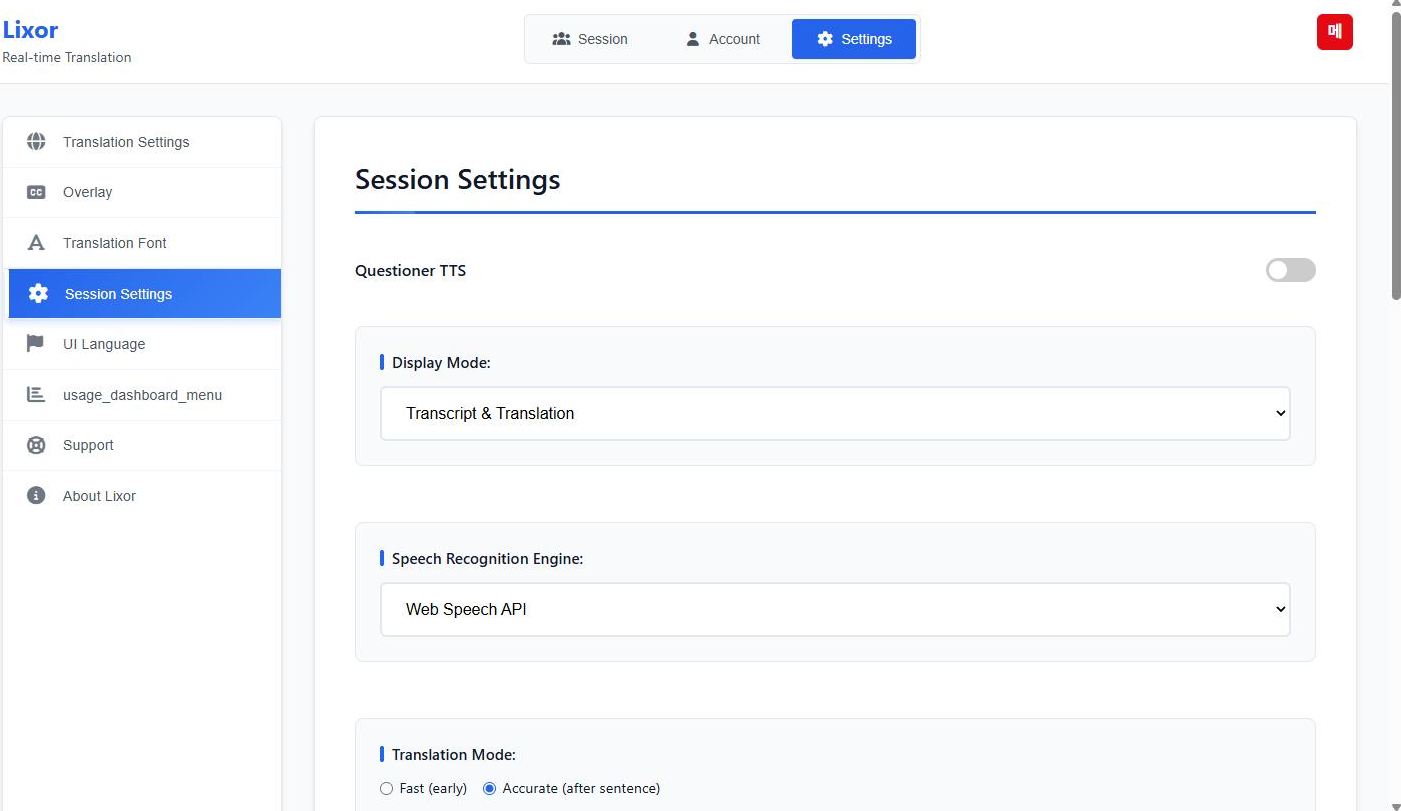
Session settings Item Description Questioner TTS Reads participant questions aloud Display Mode Silent Mode / Transcript Only / Translation Only / Transcript & Translation Speech Recognition Engine Local Whisper ASR / Web Speech API Translation Mode Fast (early) / Accurate (after sentence) Translator model Choice of translation service Microphone check Microphone Test button
Display modes
Mode Description Silent Mode Shows neither transcript nor translation Transcript Only Shows the source transcript only Translation Only Shows translations only Transcript & Translation Shows both
Speech recognition engines
Engine Description Local Whisper ASR High-accuracy recognition running locally (recommended) Web Speech API The browser's built-in speech recognition
Translation modes
Mode Description Fast (early) Begins translating before the sentence ends. Quicker, but wording may be revised Accurate (after sentence) Translates once the sentence is complete. More accurate, slightly delayed
7.5 Speech Recognition Training#
Found lower down the Session Settings screen. Manages a glossary that corrects technical terms and frequently misheard words.
Button Description Reload Refreshes the glossary Add Term Adds a new correction rule Test Post-processing Tries the correction rules Debug Shows correction details
The glossary list can be filtered by file, searched by term, and each entry has Edit and Delete buttons.
Adding a term
Click Add Term .
In the original text field, enter the text that was recognised incorrectly.
In the corrected text field, enter the correct wording.
Save.
7.6 UI Language#
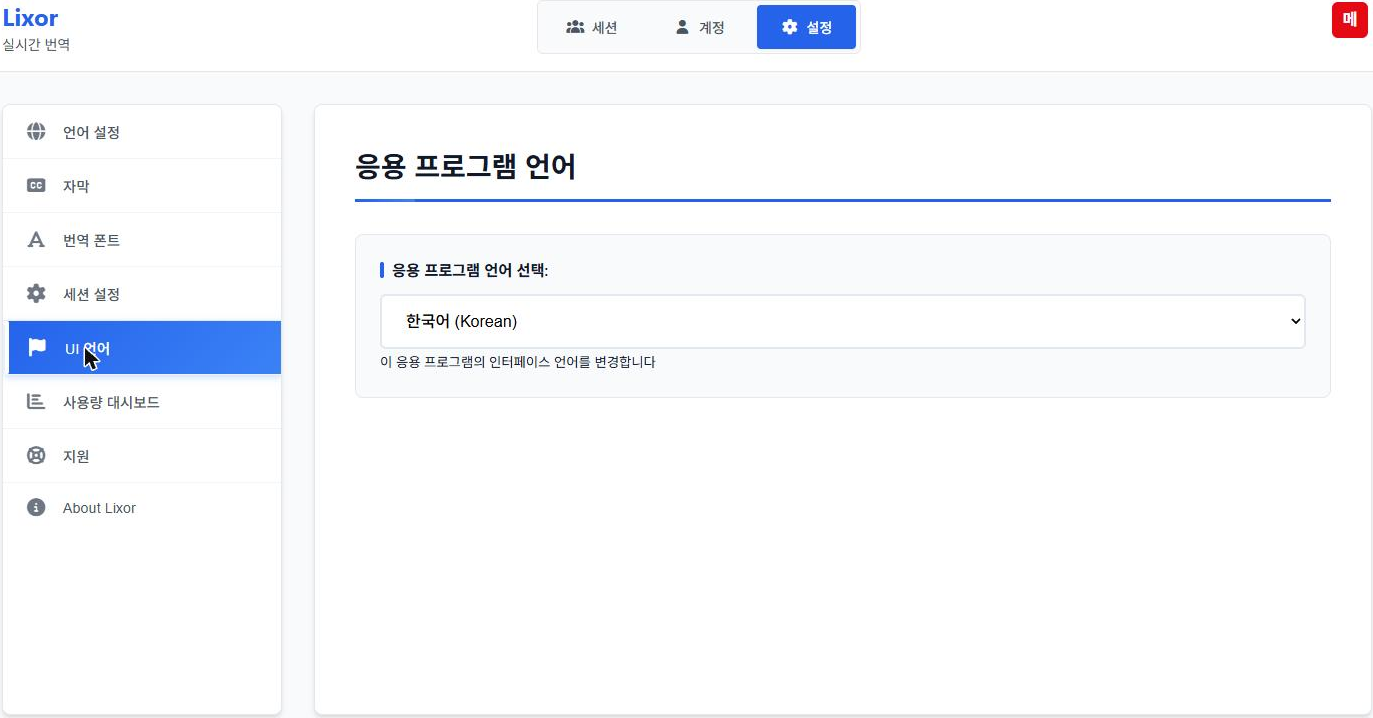
Application language settings Item Description Select Application Language 한국어 (Korean) / English
주의
The English interface is not fully translated in 2.5.16. The usage dashboard menu shows the untranslated key usage_dashboard_menu, and some tooltips and status messages remain in Korean.
7.7 Usage Dashboard#
See 9. Usage and Session History .
7.8 Support and About Lixor#
See 11. Support and Updates .
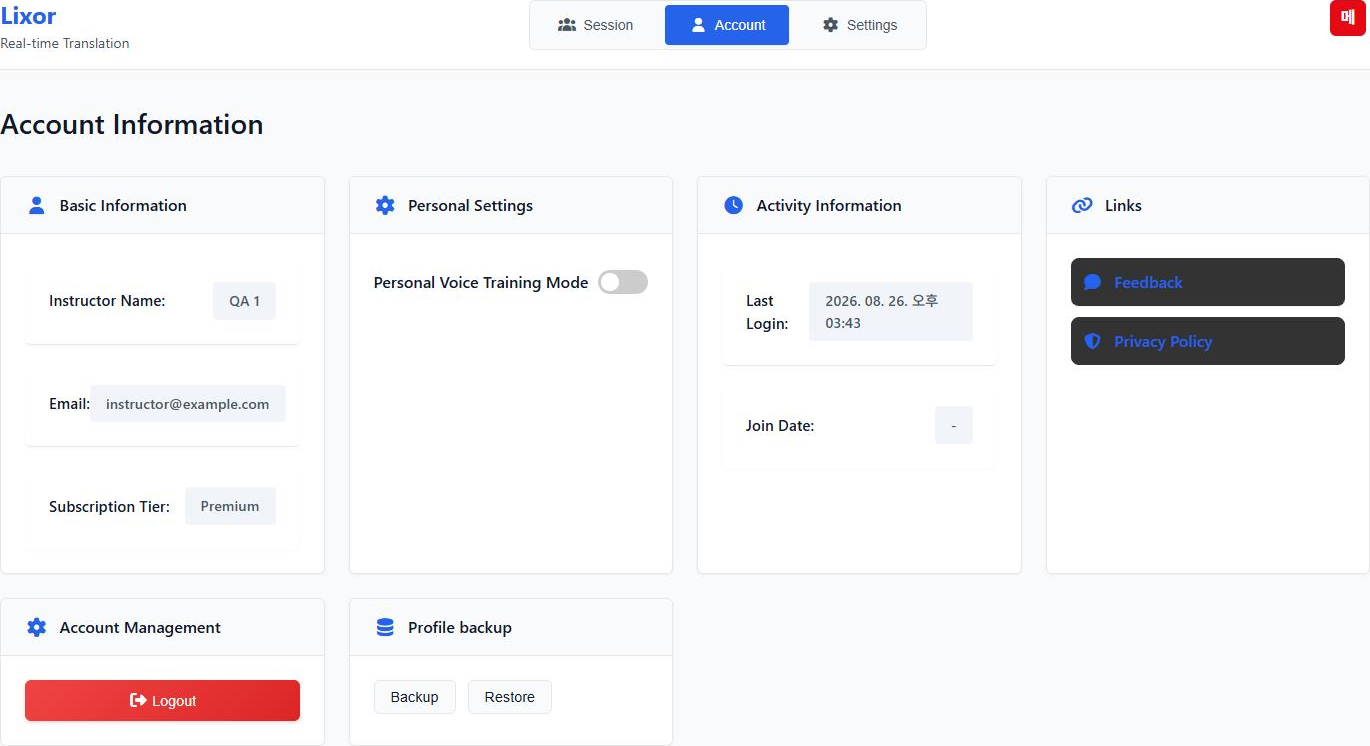
8. Account Tab Click the Account tab at the top.
Account tab Item Description Instructor Name Your registered name Email Sign-in email Subscription Tier Basic / Premium
8.2 Personal Settings#
Item Description Personal Voice Training Mode Training mode that improves speech recognition accuracy
Item Description Last Login Most recent sign-in time Join Date Account creation date
8.4 Links#
Item Description Feedback Submit suggestions for improving the service Privacy Policy View the privacy policy
8.5 Account Management#
Item Description Logout Signs out of the current account
8.6 Profile Backup#
Button Description Backup Downloads profile settings as a file Restore Applies settings from a backup file
See 3. Profile Management for details.
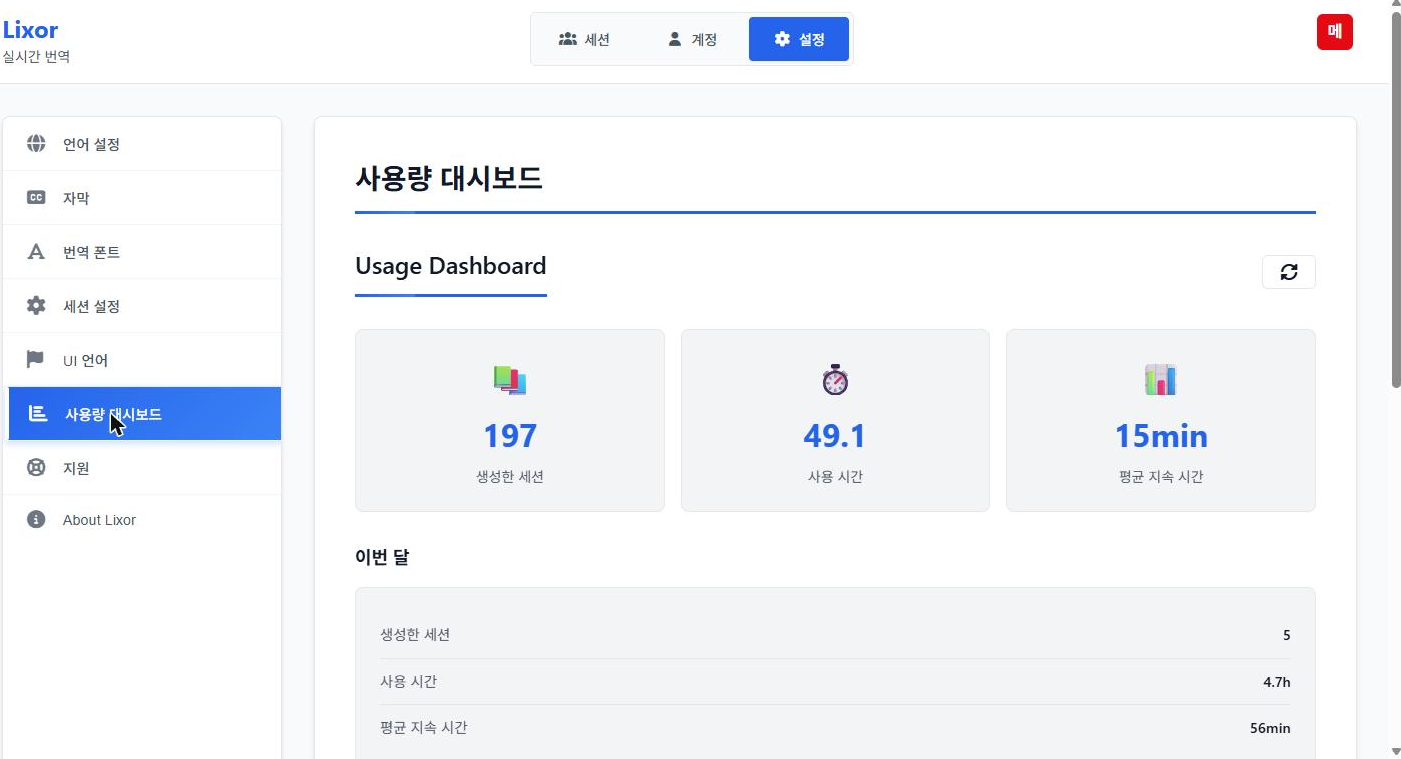
9. Usage and Session History New in 2.5.16. Open Settings → Usage Dashboard .
참고
In the English interface this menu item currently displays as usage_dashboard_menu — an untranslated key. It is the Usage Dashboard.
9.1 Usage Summary#
Usage dashboard Item Description Sessions created Total number of sessions Hours used Cumulative usage in hours Average duration Average length of one session
This month repeats the same three figures for the current month. Use the refresh (↻) button at the top right to reload the latest values.
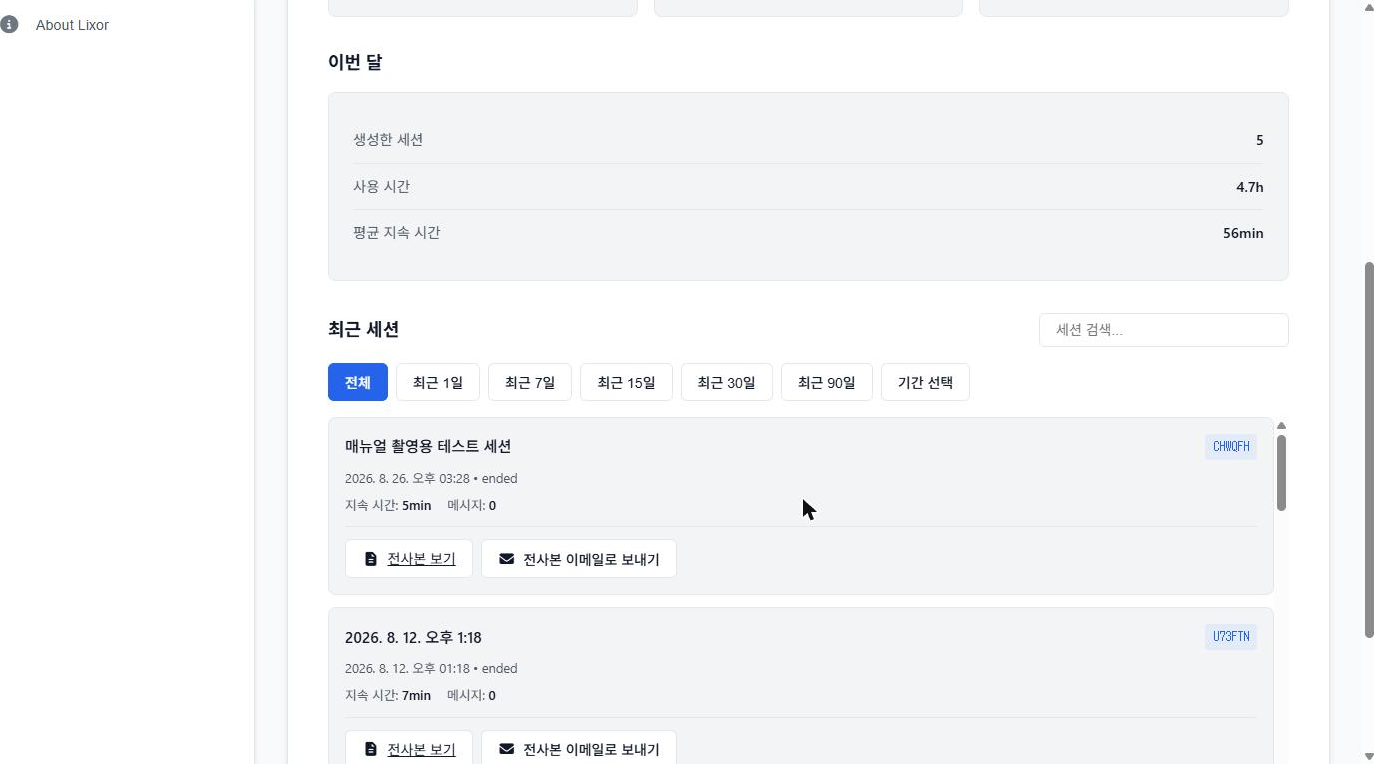
9.2 Recent Sessions#
Past sessions are listed below the dashboard.
Recent sessions list Period filters
All · Last 1 day · Last 7 days · Last 15 days · Last 30 days · Last 90 days · Custom range
For a custom range, set the start and end dates, then apply. You can also search by title using the search box at the top right.
What each session card shows
Item Description Session title The title entered when the session was created Date and status Start time and whether it has ended Duration How long the session ran Messages Number of transcript and translation messages Session code Shown at the top right of the card
팁
The 6-digit code is not shown on the live session screen. If you need the code of a past session, find it here.
9.3 Working with Transcripts#
Each session card has two buttons.
Button Description View transcript Opens that session's transcript and translation record Email transcript Sends the transcript by email
Click Show more below the list to load older sessions.
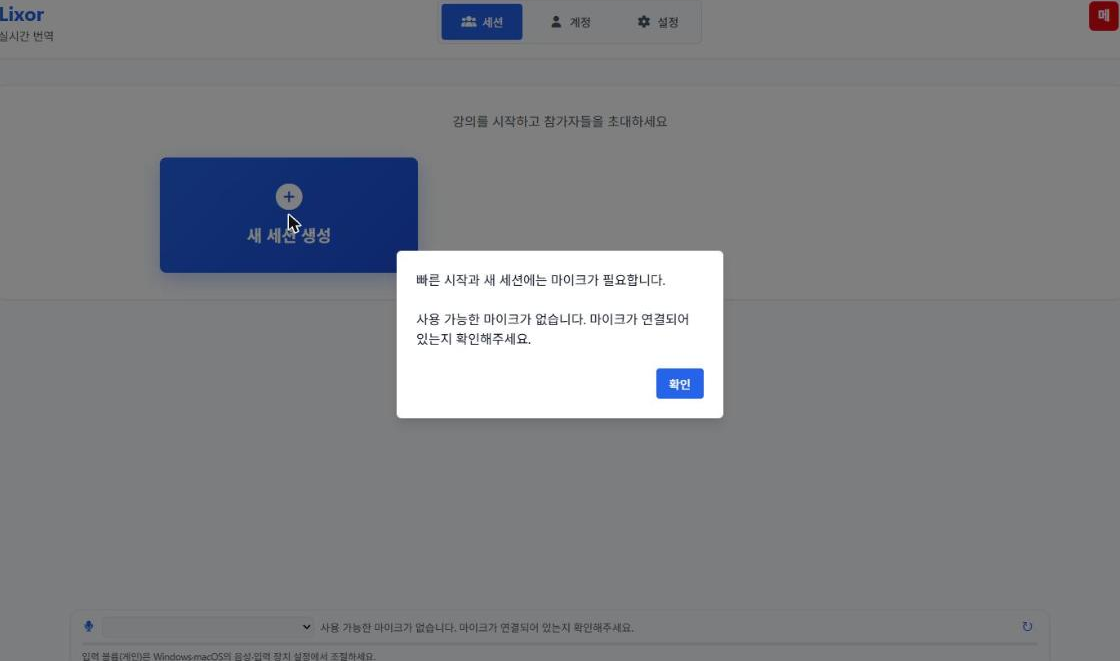
10. Troubleshooting 10.1 "No microphone available" when creating a session#
Session creation stops with a message saying a microphone is required.
Microphone required dialog 중요
This message appears not only when no microphone is physically present, but also when browser microphone permission has not yet been granted. If your microphone is connected and you still see this, check permissions first.
1) Check browser permission
Click the 🔒 icon at the left of the address bar.
Set Microphone to Allow .
Reload the page.
2) Check the microphone device
Pick your device from the dropdown in the microphone bar at the bottom.
If the list is empty, click the refresh (↻) button.
The status line should confirm the microphone is available.
3) Check whether another app is using the microphone
If Zoom, Teams or similar is holding the microphone, quit that app.
10.2 Speech recognition keeps cutting out#
Change the engine : set Settings → Session Settings → Speech Recognition Engine to Local Whisper ASR .Check your network : a stable internet connection is required.Adjust microphone placement : keep a consistent distance and reduce background noise.Check input level : if the level meter barely moves, raise the gain in your OS sound input settings.
10.3 Translations are not showing#
Check display mode : set Settings → Session Settings → Display Mode to Transcript & Translation .Check the translation language under Settings → Translation Settings .Check translation mode : Accurate (after sentence) waits for the sentence to finish. If it feels slow, try Fast (early) .
10.4 Participants cannot join#
Confirm the session is running. Ending a session invalidates the QR code and code immediately.Show the QR code again. From 2.5.16 you cannot read a code aloud instead.Check the address. The join domain is lixor-web2.datant.ca.
주의
The join domain changed from lixor-web.datant.ca to lixor-web2.datant.ca
Quick Start (Multi) and Quick Start (Caption) appear only after you save their settings.
Button How to make it appear Quick Start (Multi) Settings → Translation Settings → choose quick start languages → save Quick Start (Caption) Settings → Overlay → configure the overlay → save Quick Start (Caption)
10.6 The app will not start#
Restart the app : quit completely, then launch again.Clear the cache : clear your browser cache and retry.Check for updates : Settings → About Lixor → Check for updates .
Item Details Email support@klec.tech Phone 031-385-2251 Operating hours Weekdays 09:00 - 18:00
Information to include when contacting us
Device model name
App version (Settings → About Lixor)
Description of the problem
Error message (if any)
Screenshot (if possible)
11. Support and Updates 11.1 Support#
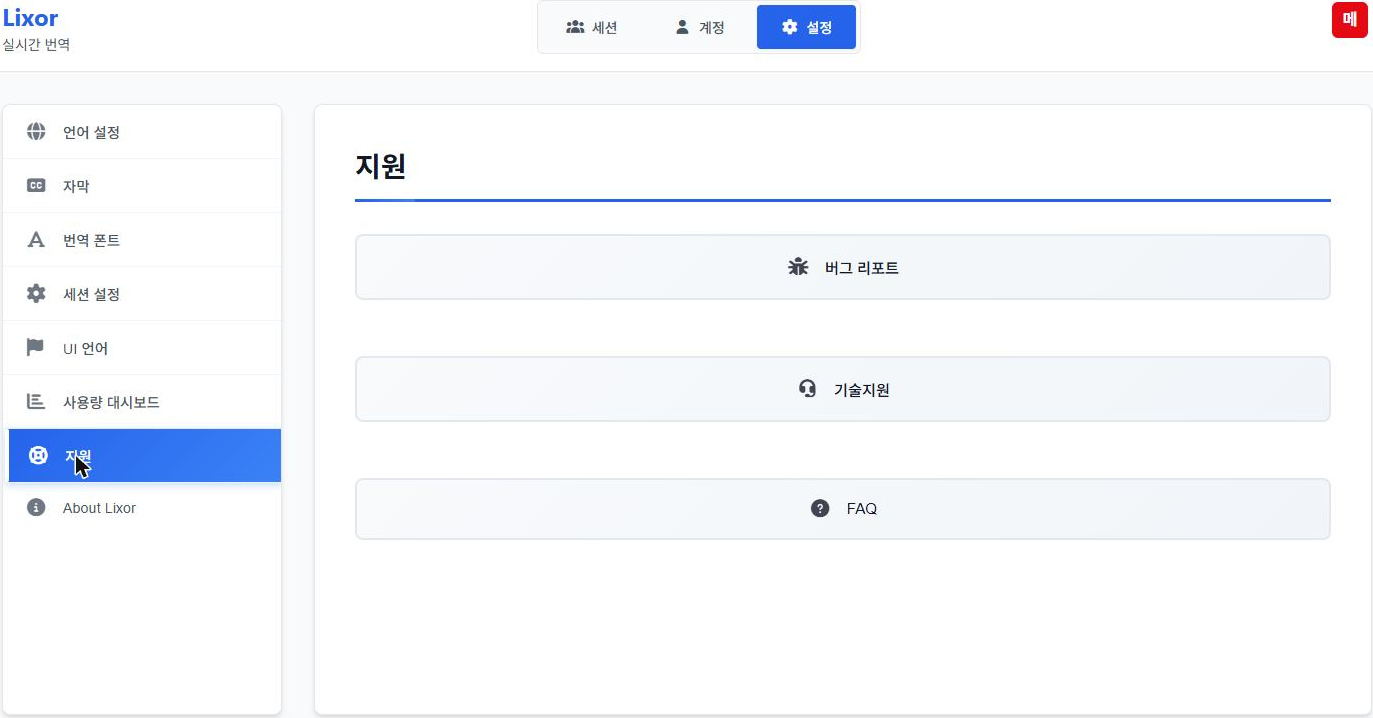
Open Settings → Support .
Support screen Button Description Bug Report Bug reporting form — title, description, steps to reproduce, environment, contact Technical Support Technical enquiry form — type, title, details, phone number FAQ Frequently asked questions
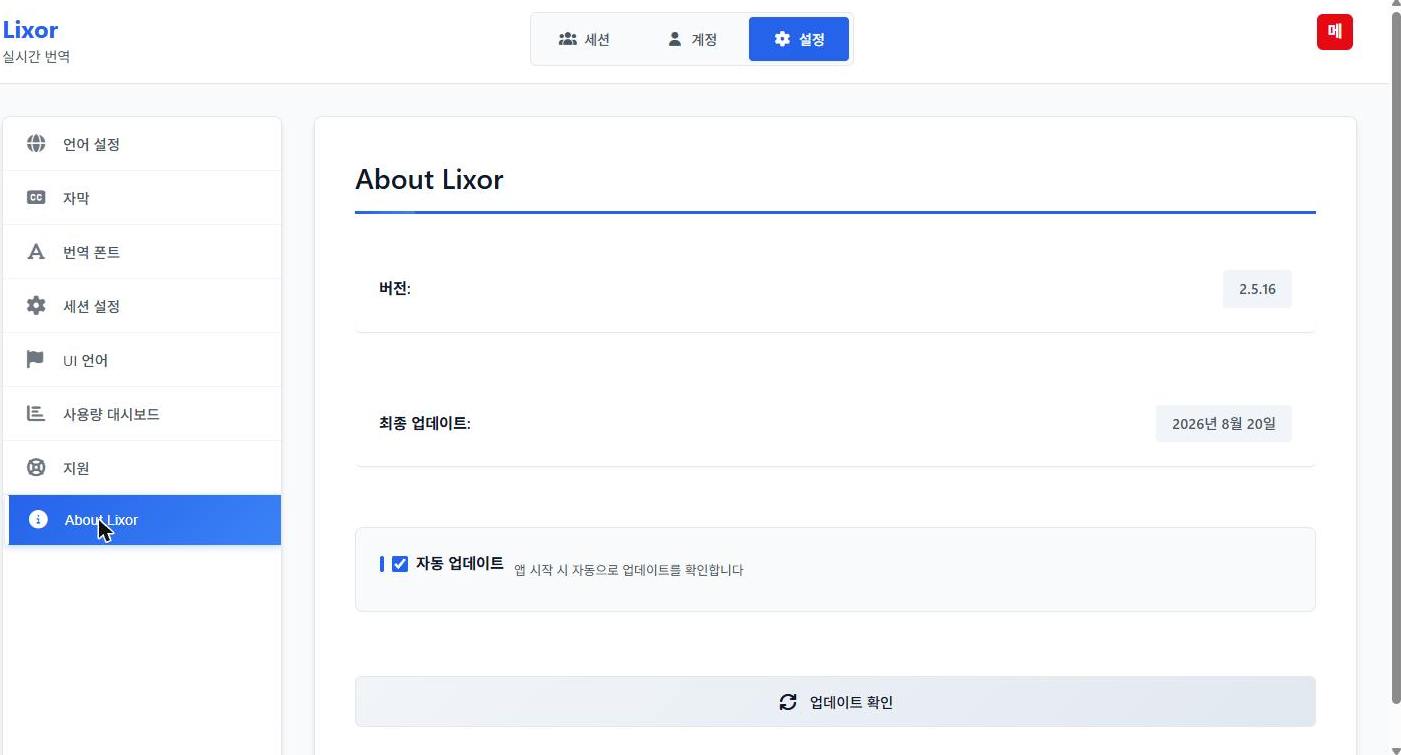
11.2 About Lixor#
Open Settings → About Lixor .
About Lixor screen Item Description Version Current app version Last updated Date of the most recent update Auto update Checks for updates automatically at app start Check for updates Checks for a new version immediately
11.3 Running an Update#
When a new version is available, an update notice appears.
Button Description Start now Begins the update immediately Later Skips this time
If the update cannot proceed, a notice appears with an option to notify your administrator.
팁
Do not update right before a lecture. The app restarts during an update and you cannot open a session.
Item Details Email support@klec.tech Phone 031-385-2251 Operating hours Weekdays 09:00 - 18:00
1. Joining a Class You can join a class instantly using your smartphone camera without installing any extra apps.
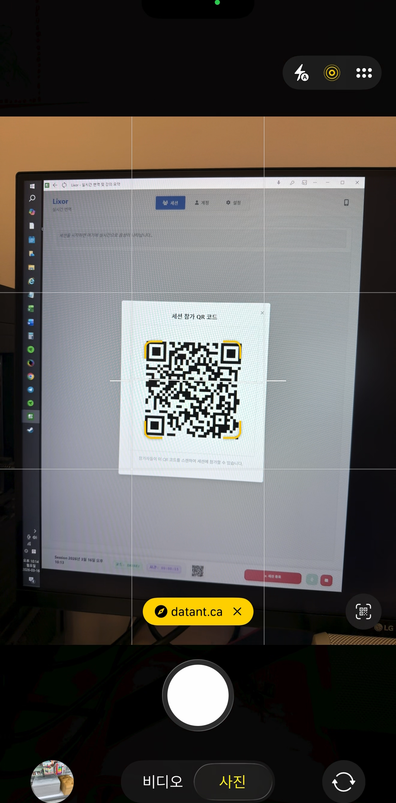
1.1 Scan the QR Code#
Open your smartphone's default Camera app.
Point it at the QR code displayed on the classroom screen.
Tap the link that appears at the top of the screen.
Scanning the classroom QR code Tapping the link takes you straight into the class — there is no separate join button to press.
중요
The address is lixor-web2.datant.ca. If an older handout shows lixor-web.datant.ca (without the 2), that address will not work.
1.2 If You Missed the QR Code#
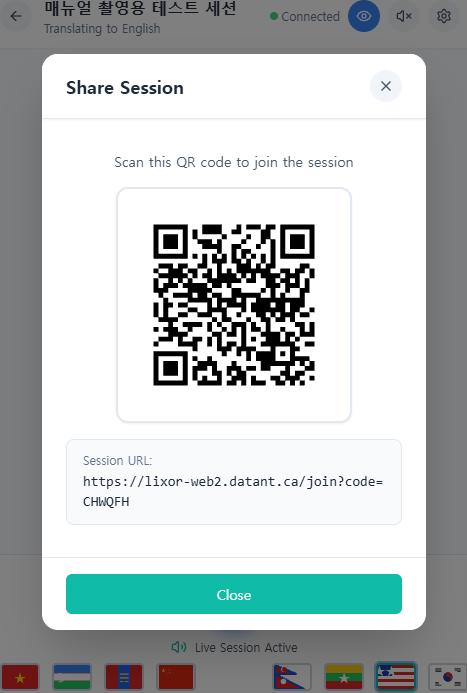
Ask your instructor to show the QR code again. If a classmate has already joined, you can scan the QR code from their screen instead — see 5. Other Useful Features .
참고
Earlier versions let you type a 6-digit session code. Joining is now by QR code only.
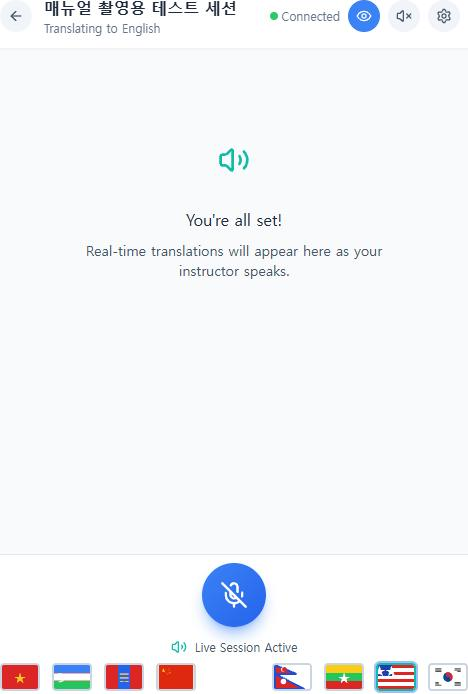
2. Screen Overview Once you enter, your instructor's speech appears translated on screen in real time.
Student session screen 2.1 Top Bar#
Element Position Description ← Top left Leaves the session Session title Top left The class name and target language (Translating to …) Connected Top right A green dot means you are connected 👁 (eye) Top right Shows or hides the original text 🔇 (speaker) Top right Turns spoken translation on or off ⚙ (gear) Top right Change language, share QR code, sign out
2.2 Bottom Bar#
Element Description Microphone button Use it when you need to speak or ask a question Live Session Active Indicates the class is in progress Flag icons Tap to switch the translation to that language instantly
2.3 Translation Area#
Before your instructor speaks, the screen shows You're all set! Once they start speaking, translations appear there in order.
3. Setting the Translation Language Here are two ways to set the language so you see subtitles in your native language.
3.1 Method A — Quick Change (Bottom Flag Icons)#
Tap one of the flag icons at the very bottom of the screen to switch the translation instantly. A Language changed to … notice appears briefly at the top.
Flag icons at the bottom of the student screen 3.2 Method B — Search the Full Language List#
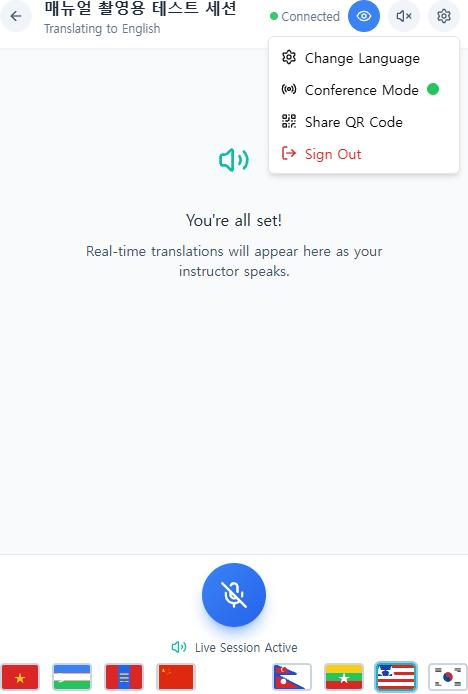
Tap the Settings (⚙) icon in the top right corner.
Tap Change Language .
Settings menu
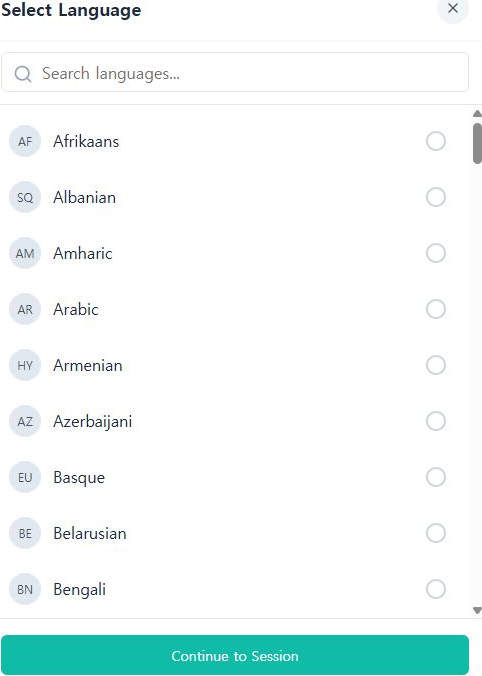
Scroll to find your language, or type its name in the search bar (Search languages...).
Select your language, then tap the green Continue to Session button at the bottom.
Language selection screen 팁
The list is long. Typing the first two or three letters of the English name finds it fastest.
4. Using the Microphone & Granting Permissions If you need to speak during class, you must allow microphone and speech recognition permissions on your smartphone the first time.
4.1 Granting Permission#
Tap the Microphone button at the bottom centre of the screen.
When the Speech Recognition permission popup appears, tap Allow (or 허용).
When the Microphone permission popup appears, tap Allow (or 허용).
When the microphone button changes colour, speech recognition has started. You may speak.
Microphone button on the student screen 참고
You only need to grant these permissions once.
4.2 If You Tapped Deny by Mistake#
Tap the lock icon in your browser's address bar, set microphone access to Allow , then reload the page.
4.3 If the Question Feature Is Locked#
When your instructor locks questions, the microphone cannot be used. Ask your instructor to unlock questions.
6. Technical Support 6.1 Common Problems#
Symptom What to do I cannot connect Check the address is lixor-web2.datant.ca. The old address (lixor-web.datant.ca) no longer works The QR code does not open anything The class may have already ended. Check with your instructor No translations appear Check the Connected indicator at the top is green. If it is grey, check your network The microphone does not work See 4. Using the Microphone & Granting Permissions I cannot see the original text Check whether the eye (👁) icon at the top is switched off
6.2 Support Channels#
Item Details Email support@klec.tech Phone 031-385-2251 Operating hours Weekdays 09:00 - 18:00
Device model name
Browser used
Description of the problem
Error message (if any)
Screenshot (if possible)