1. Product Overview Global Interviewer is an AI-powered video conferencing system with real-time interpretation and translation. It removes the language barrier from global meetings and makes meeting records easy to manage.
참고
The app and its web address use the name tong . This manual refers to the product as Global Interviewer throughout.
1.1 Suited To#
Job interviews with candidates who speak other languagesUniversity admission interviews for international applicantsBusiness meetings with overseas partnersSeminars and training with a mix of languages in the room
1.2 What You Need#
Item Description PC or smartphone Runs in a web browser — no app installation Camera and microphone Required to join a meeting Internet connection Required for interpretation and video
1.3 How It Differs From Ordinary Video Conferencing#
You get the usual conferencing features — screen sharing, recording, microphone and camera control — plus live subtitles translated into each participant's own language , and an AI summary with a full transcript to download once the meeting ends.
2. Key Features 2.1 Real-time Multilingual Translation#
Subtitles appear as you speak, and chat messages are translated too.
2.2 Smart Meeting Management#
Start instantly, schedule ahead, or join with a code — several ways in.
2.3 Automated Meeting Data#
When a meeting ends, download the AI summary and the full transcript (STT) data .
2.4 Solid Everyday Usability#
An integrated dashboard with usage monitoring
Screen sharing, recording, microphone and camera control
An intuitive, familiar interface that anyone can pick up
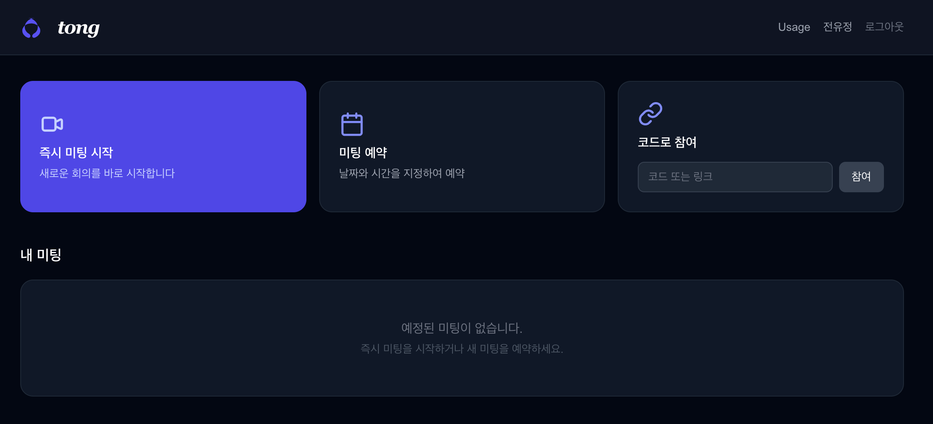
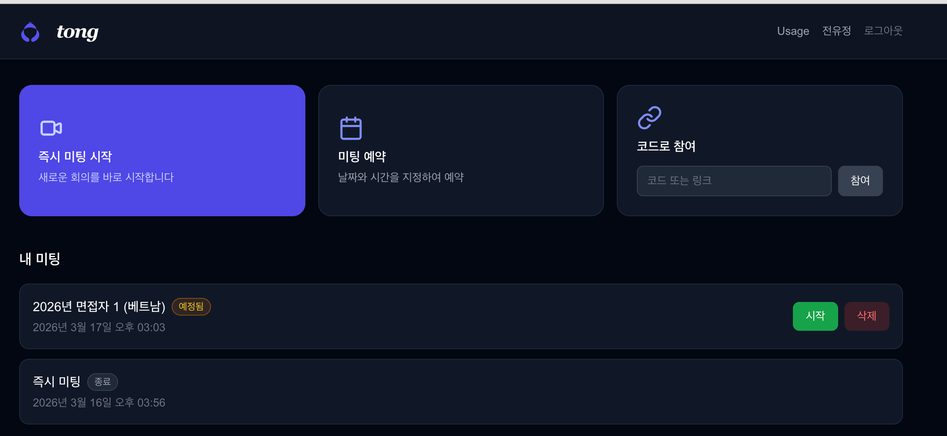
3. Dashboard The start screen you see after signing in.
Dashboard start screen 3.1 Creating and Joining Meetings#
Method Description Start instant meeting Starts a new meeting with one click Join with code Enter a code or link you were given Schedule meeting Set date, time and topic, and invite participants by email
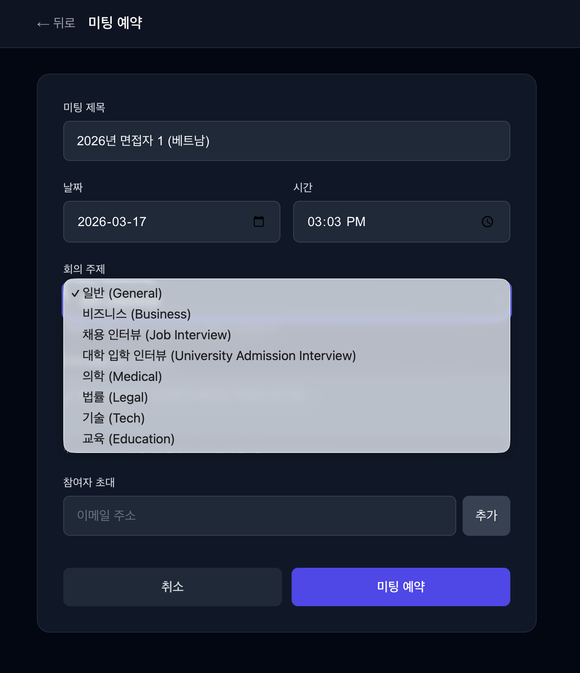
3.2 Scheduling a Meeting#
Schedule meeting screen
Choose Schedule meeting .
Enter the meeting title .
Set the date and time .
Select the meeting topic .
Enter participant email addresses and click add.
Click the schedule button.
Available meeting topics
Topic Korean label General 일반 Business 비즈니스 Job Interview 채용 인터뷰 University Admission Interview 대학 입학 인터뷰 Medical 의학 Legal 법률 Tech 기술 Education 교육
팁
The topic affects the quality of the AI summary. For a hiring interview, choose Job Interview so the summary is organised around interview context.
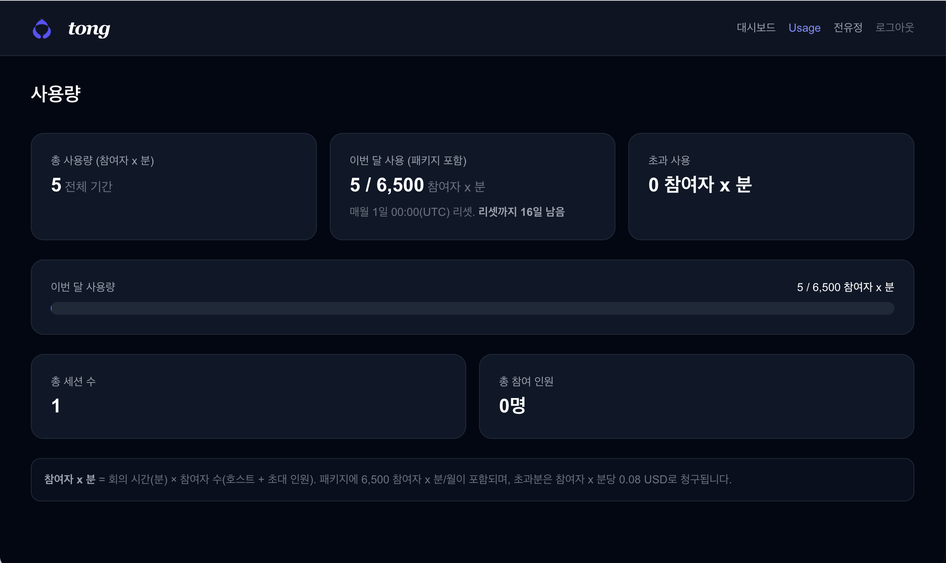
3.3 Checking Usage#
Open the Usage tab in the top menu.
Usage tab Item Description This month's usage Calculated as participants × minutes Package balance Minutes remaining Total sessions Cumulative meeting count Total participants Cumulative participant count
3.4 My Meetings#
The My Meetings list further down the dashboard shows upcoming and finished meetings. See 8. Meeting Records and Data for details.
4. Before Joining a Meeting 4.1 Granting Device Permissions#
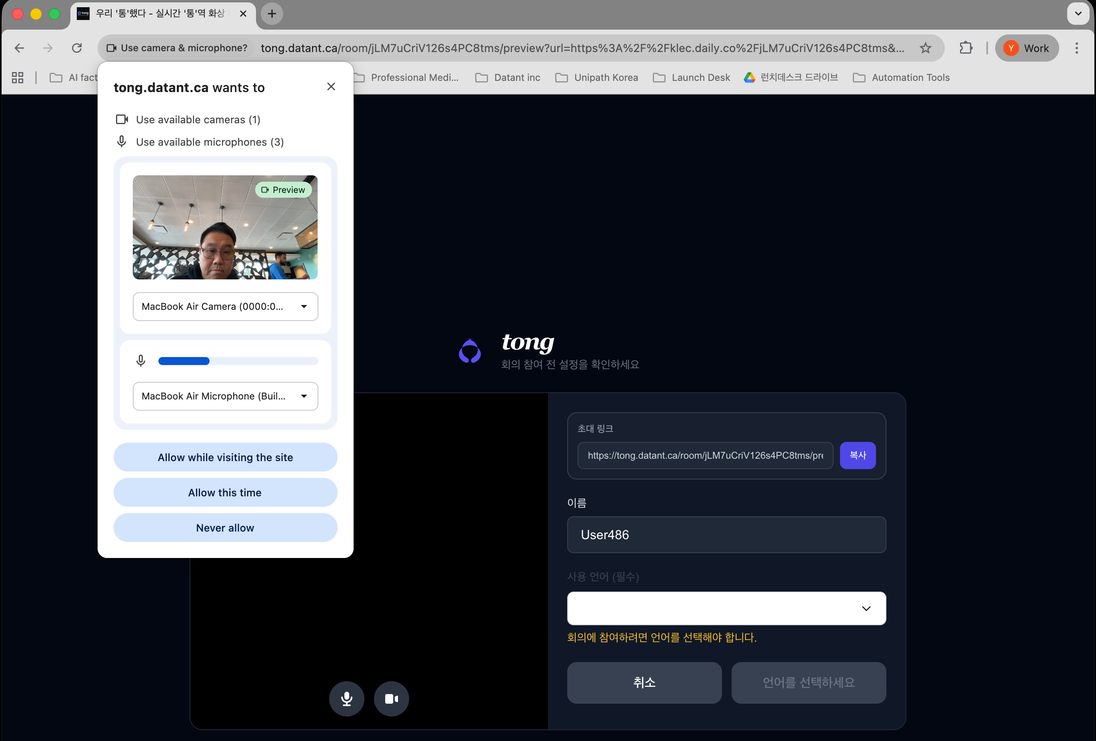
When a meeting starts, your browser shows a permission popup at the top. You must allow camera and microphone access.
Browser device permission popup 주의
If you deny permission you cannot join. If you denied by mistake, re-enable it from the lock icon in the address bar and reload the page.
4.2 Testing Your Devices#
On the waiting screen before entry, select the camera and microphone you want to use and check that they work.
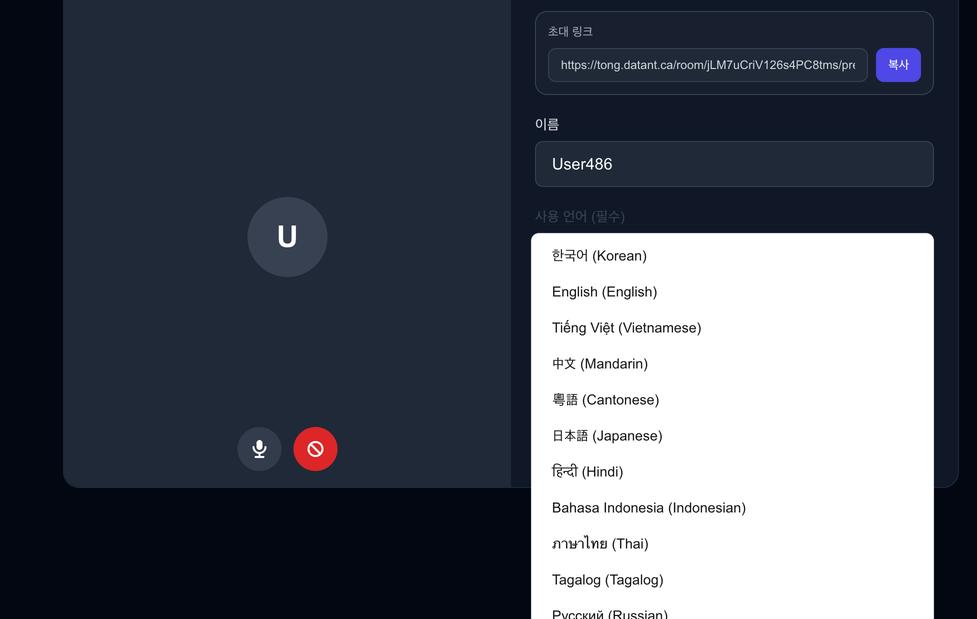
4.3 Name and Language (Required)#
Pre-join settings screen
Enter your name as it will appear in the meeting room.Select your language from the dropdown.Click the button to enter the meeting.
중요
You cannot join without selecting a language. You also cannot change it once the meeting is under way , so set it correctly before entering.
Available languages include 한국어, English, Tiếng Việt, 中文, 廣東話, 日本語, हिन्दी, Bahasa Indonesia, ภาษาไทย, Tagalog and Русский.
4.4 Copying the Invite Link#
Click the copy button at the top right to share the meeting link with other attendees.
5. Using the Meeting Screen 5.1 Bottom Control Bar#
Button Function Microphone Mutes or unmutes you. Shown in red when disabled Camera Turns your video off and on. Shown in red when disabled Screen share Shares a Chrome tab, a program window, or your entire screen Record Records the meeting in progress Chat Opens the translated chat panel Settings Opens language and recognition settings Leave Exits the meeting
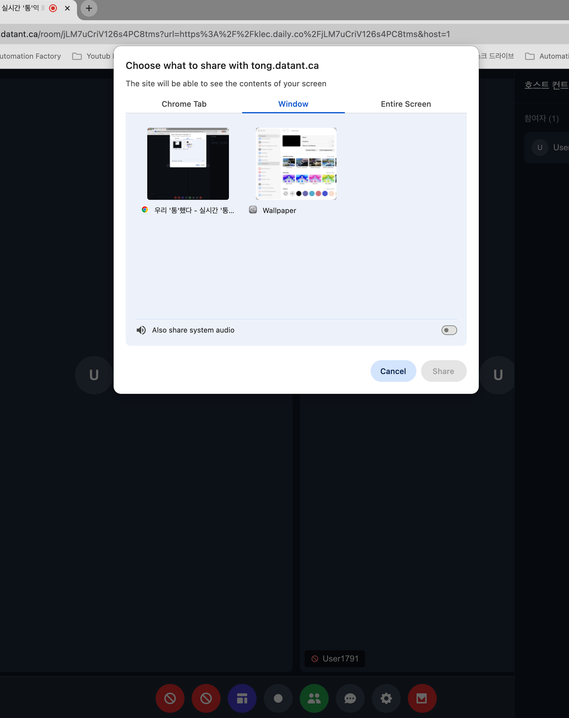
5.2 Screen Sharing#
Click the screen share icon to choose what to share.
Choosing what to share Tab Scope Chrome Tab A single Chrome tab Window A specific program window Entire Screen Your whole screen
팁
If you are playing video or audio, turn on share system audio in the dialog. Without it, others hear nothing.
5.3 Translated Chat#
Click the speech bubble icon to open the chat panel.
Translated chat input Type your message in your own language and send it. On the other person's screen it appears automatically translated into the language they selected.
5.4 Live Subtitles#
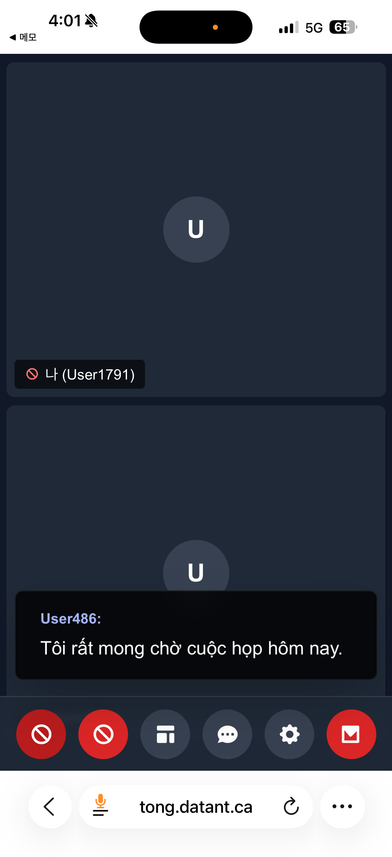
What people say is translated into each participant's chosen language and shown as subtitles.
The speaker's name and the translated subtitle appear at the bottom of the meeting screen.
Joining from a smartphone works the same way — subtitles appear in the language you selected.
Live subtitles on a mobile screen
6. Host Controls Available only to the person who created the meeting. Managed from the Host Control panel on the right of the screen.
6.1 Waiting Room#
When someone new connects, they appear in the Waiting list in the right-hand panel.
Waiting room — accept or reject Button Action Accept Lets them into the meeting room Reject Blocks entry
팁
For hiring interviews where candidates come in one at a time, use the waiting room to admit them in order.
6.2 Managing Participants#
Manage individuals from the Participants list.
Participant list Function Description Mute Forcibly turns off that person's audio Remove Ejects a participant who is disrupting the meeting
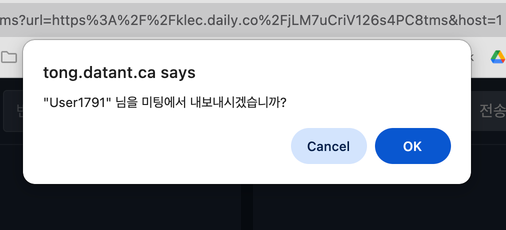
Removing someone opens a confirmation dialog.
Confirming participant removal 주의
A removed participant can try to rejoin if they still have the link or code. To block them completely, reject them at the waiting room.
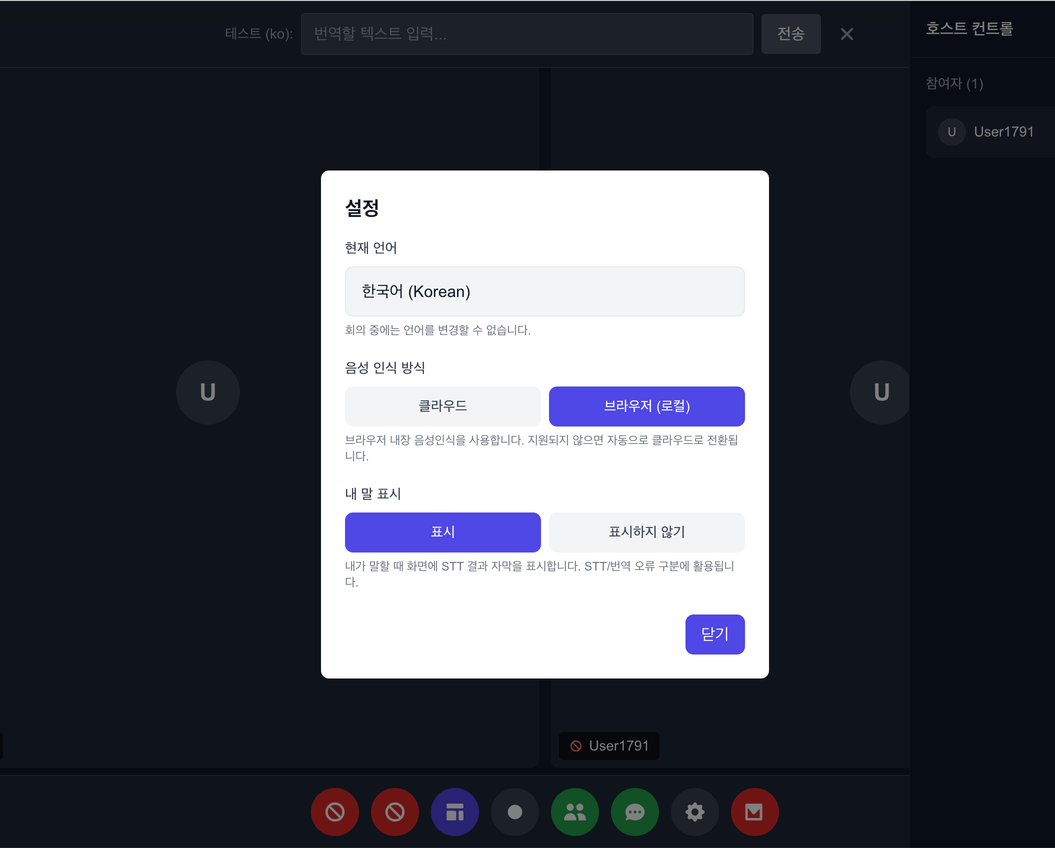
7. Settings Open with the settings (⚙) button on the bottom control bar during a meeting.
Settings screen 7.1 Current Language#
Shows the language you selected when joining.
중요
You cannot change the language during a meeting. To switch, leave the meeting and rejoin.
7.2 Speech Recognition Method#
Method Description Cloud Server-based recognition. Stable in most environments Browser (local) Uses the browser's built-in recognition
참고
Where the browser method is unsupported, it falls back to Cloud automatically.
7.3 Showing Your Own Speech#
Choose whether your own STT subtitles appear on screen while you speak.
Setting Behaviour Show Your recognised speech is displayed Hide Your own subtitles are hidden
팁
Leaving this on Show lets you check that your speech is being recognised correctly. Worth enabling for meetings full of unusual proper nouns.
8. Meeting Records and Data 8.1 After the Meeting#
Once a meeting ends, it appears in the My Meetings list on the dashboard.
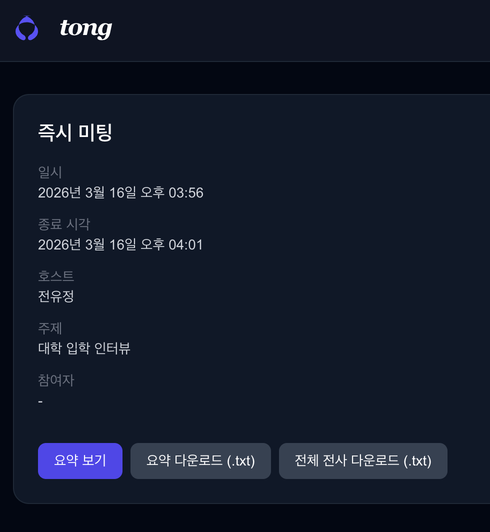
My Meetings list Click an entry to see its detail.
Item Description Date and time When the meeting started End time When it finished Host Who created the meeting Topic The topic selected when scheduling Participants Who took part
8.2 Downloading Transcripts and Summaries#
Use the buttons below the detail view to turn the meeting into documents.
Summary and download buttons Button Description View summary Shows the AI-generated summary on screen Download summary (.txt) Saves the AI summary as a text file Download full transcript (.txt) Saves every exchange from the meeting as a text file
팁
For a hiring interview, the full transcript works as evidence for evaluation while the summary suits a results report.
참고
Summary quality depends on the meeting topic chosen when scheduling — see 3. Dashboard .
9. Technical Support 9.1 Common Problems#
Symptom What to do Camera or microphone not detected Check you allowed browser permissions (4. Before Joining a Meeting ) Cannot enter the meeting Make sure you set both a name and a language I want to change my language Not possible mid-meeting. Leave and rejoin No sound when screen sharing Turn on share system audio in the share dialog No subtitles appear Try switching the recognition method to Cloud Stuck in the waiting room The host has to click Accept
9.2 Support Channels#
Item Details Email support@klec.tech Phone 031-385-2251 Operating hours Weekdays 09:00 - 18:00
Device model name
Browser and version
Description of the problem
Error message (if any)
Screenshot (if possible)
9.4 Icon Glossary#
Icon Meaning 🎤 Speech recognition (microphone) 🔊 Speech output on 🔇 Speech output off ⌨ Text input 👥 Participant count 🔄 Translated ✏ Edit 📧 Email ✓ Done / success ⚠ Warning ❌ Error